Thinking about restoring furniture? If you have antique, vintage, or worn furniture pieces, restoring them can be a budget-friendly home improvement idea. Learn more in our guide to furniture restoration!
Once you’ve decided what type of furniture piece you want to restore, you’ll need to understand what all is involved with the restoration—including transportation, workspace outfitting, and the average cost of the project. Putting a budget in place helps ensure you’ll have the means to purchase the necessary tools, supplies, and fabrics as you work on your DIY project. Some antiques, especially those holding sentimental value, might be best left to professionals, which can get expensive.
No matter if the project is a small fix or full furniture restoration, you’ll want to create a timeline. Keep a calendar to ensure your furniture restoration is completed in a timely manner—you can easily set a tracker on your phone as a reminder of key steps. It’s important to complete the restoration steps in the proper order to protect your investment, as well as to not cause damage to your piece. If your DIY furniture project involves staining wood, establishing a timeline is an especially good idea—as you’ll need to keep track of how much time has passed, whether the humidity is appropriate, and more.
As you prepare the project, avoid potential hazards by making sure DIY furniture restoration safety is your top priority. Try wearing long-sleeved clothing to help protect your skin from chemicals, and always put on safety glasses to keep your eyes protected. Wear a mask when stripping or varnishing a piece, and be sure to keep the area well-ventilated so fumes can dissipate.
There are two things you’ll keep in mind when buying used furniture or using vintage pieces for a DIY project—pests and damage. In addition to signs of insect infestations, mold and mildew infestations are important to identify as well, as these can cause structural damage to the furniture. Additionally, noting damage on the furniture allows you to budget more accurately. If you’re planning to sell the finished furniture restoration, be sure you provide product information—like its origin, make, or model—which can also help you better price the item.
Prior to starting furniture refurbishment, get an idea of what you want the finished piece to look like. Do you want to restore it to its original glory, or will you be upcycling furniture into a combination of old and new? Consider its color, texture, and fabric before you begin. This will help you match the rest of your home decor style or the other finishes on your furniture. When refurbishing antiques or older furniture, consider matching the original stain or colors as close as possible to keep it authentic.
Before the furniture restoration phase begins, there are some common mistakes that may occur during the project. From ignoring potential safety hazards to not following directions for painting or staining, here are several mistakes you want to avoid.
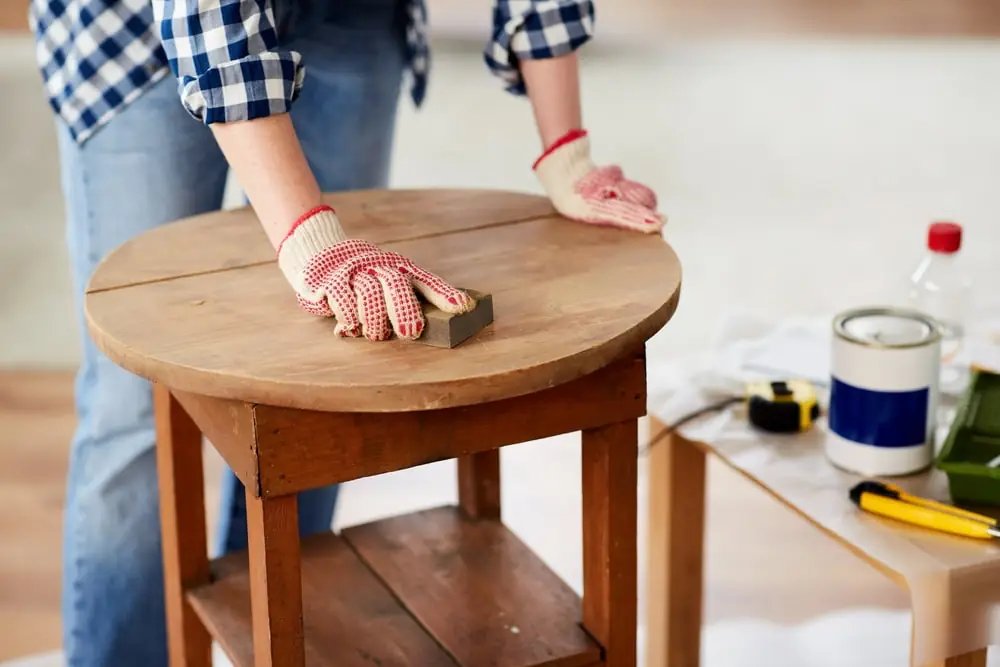
Ignoring safety hazards can be dangerous when restoring furniture because it involves chemicals and tools that could easily injure you or your surroundings. You’ll always want to use items like gloves, masks, and protective footwear to keep your body safe. It’s also important to wear safety glasses or splash goggles to prevent dust or dirt from flying into your eyes.
Not paying attention to application instructions can impact how the finished furniture piece looks. Follow the specific directions set for applying stripping chemicals, paint, and stains. To achieve good results for furniture restoration, you’ll also want to follow step-by-step instructions for sanding, staining, and more.
Depending on whether you’re working inside your shouse, outdoors, or in a garage, it’s important to protect the walls, ground, and other nearby areas of the home. Use tarps to protect the ground or place plastic drop cloths or cardboard underneath the piece of furniture to catch any paint or stain spills as you strip, sand, paint, and stain. If you’re limited on space, covering other nearby items is also a good idea—especially if you’re using wind as your ventilation, things like paint can easily drip on the floor or get caught in the wind.
Because furniture restoration can take a while to complete, don’t rush through the project. Properly complete each step before moving on to the next one. Rushing through the project can cause uneven painting or staining, items can turn out blotchy, or they won’t dry properly. Applying stain or sealing coats evenly with a tool can help with the overall look of the piece.
Wondering what kind of furniture restoration project you want to take on? There are several types of projects for restoring furniture, like refinishing wood, reupholstering fabric, or antique restoration. Here are some of the main ones you can dig into!
Decorating with antiques is a fun choice, but the restoration process involves a lot of skill. For delicate items, you’ll want the right antique restoration tools and supplies like saws, screwdrivers, drills, paintbrushes, paint, or stain. Antiques can often be restored on-site at a local business, or they can be a DIY project like restoring an old bookcase or table.
Buying and reselling furniture online is a popular furniture restoration project that also gives you a profit! Buy antiques or old furniture at estate sales, antique shops, or auction houses. After purchasing, repair and restore the item, and then sell it on an online marketplace.
There are several steps to take when restoring furniture in order to achieve good results. Fortunately, many restoration steps can be used for metal and upholstered furniture as well—as wooden furniture restoration often involves more steps, materials, time, and care. From cleaning the item to applying final touches, here’s a step-by-step guide for furniture restoration!
The first step to restoring furniture is gathering all of the supplies necessary to complete the project. This often includes paintbrushes, dish soap, paint stripper, sealant, towels, eye and hand protection, and an electric or hand-held sander. For wood furniture, make sure to have sandpaper, stain rags, wood putty, a putty knife, and primer on hand.
Start by cleaning the surface of the piece with dish soap, warm water, and a cloth rag to remove dirt, grime, and other buildup. After scrubbing the exterior, rinse it with a damp washcloth, and finish with a towel dry. It’s important to not only let the furniture dry completely, but also best to use cloth towels to prevent residue. Dissemble each piece of furniture—for example, you’ll want to remove each drawer from a dresser, and remove the handles, as well. Finally, clean the interior of the furniture, including the undersides of tabletops, walls of each drawer, and legs of the piece.
Depending on whether your furniture has an existing paint color, finish, or stain, you’ll need to remove it before sanding. During this step, you’ll need to apply a chemical stripper to the furniture’s surface. Let the chemical stripper sit on the surface for around 20 minutes and scrape the paint or stain off before you rinse it and begin sanding. This step should be completed in a well-ventilated area while using rubber gloves and eyeglasses for additional protection.
To ensure the new paint or stain applies evenly, you should first sand down the entire furniture piece. Fill any holes on wooden surfaces with wood putty before sanding. For smaller items or areas with fine detail, you’ll need fine-grit sandpaper sheets and sanding blocks—use a power sander for larger surfaces. To reach uniform smoothness, sand it in the direction of the grain. After the sanding is complete, wipe down or blow on the piece to remove remaining dust and wood chips.
After sanding down the furniture, you can use supplies like a paintbrush to help apply a sanding sealant to the entire item. This type of clear liquid base finish will help your stain appear more even and consistent—which is especially beneficial for inconsistently porous materials like wood. A sanding sealant will prevent the wood from absorbing excess stain and can prevent shifts in the final color.
Once you’ve finished sealing your piece and it’s dry, you can paint or stain it! In order to get the final look you want, you may need to apply multiple coats of paint to your item. There are several types of paint finishes to choose from like semigloss, matte, or satin. It’s important to follow the directions when applying paint or stain to the item and the post-application directions to achieve the look you want. The common types of stains you can select for your furniture include gel stains, mineral sealants, oil-based stains, and water-based stains. If you’re unsure what color or type of stain you need, talk with a professional at a local hardware store. The best tip to keep in mind when staining is to make sure your pressure and timing is consistent.
After you let the paint or stain dry completely, start to apply varnish, shellac, or wax to finalize the furniture restoration. These types of finishing products will add a shine to your item and also help to seal, waterproof, and scratch-proof your furniture. If you’re unsure which type of finishing product to go with, conduct research or consult with a pro at your hardware store for recommendations on your specific type of furniture restoration project.
***
Looking to store furniture while working on your furniture restoration projects? Extra Space Storage has several storage facilities located around the U.S. that can help. Find self storage near you!
Extra Space Storage is excited to announce Anastasia Krecklow as the Q2 2024 recipient of…
Below is a statement communicated to Extra Space Storage employees to commemorate the one-year mark…
Extra Space Storage recently opened several self storage locations in various markets across the U.S.,…
How much does it cost to rent climate-controlled storage? In this self storage guide, Extra…
Moving to Greensboro or one of the surrounding areas? There are plenty of great places…
Extra Space Storage recently opened several self storage locations in various markets across the U.S.,…
This website uses cookies.