Some of the hardest areas to tackle during spring cleaning are your home’s storage rooms. Used and cleaned less frequently than other spaces, they can quickly become messy and cluttered—but with the right approach, you can get them neat and tidy. If you’re wondering how to prepare for spring cleaning, start by identifying which storage rooms need decluttering, and make a spring cleaning checklist to help avoid burnout. Then, gather all your spring cleaning supplies before getting started:
- All-purpose cleaners & disinfectant spray
- Microfiber cloths or washable rags
- Sponges & scrub brushes
- Duster
- Vacuum with a clean filter
- Mop & bucket
- Glass cleaner
- Trash bags
- Donation boxes
- Storage bins/baskets for organizing
- Bleach
- Distilled white vinegar
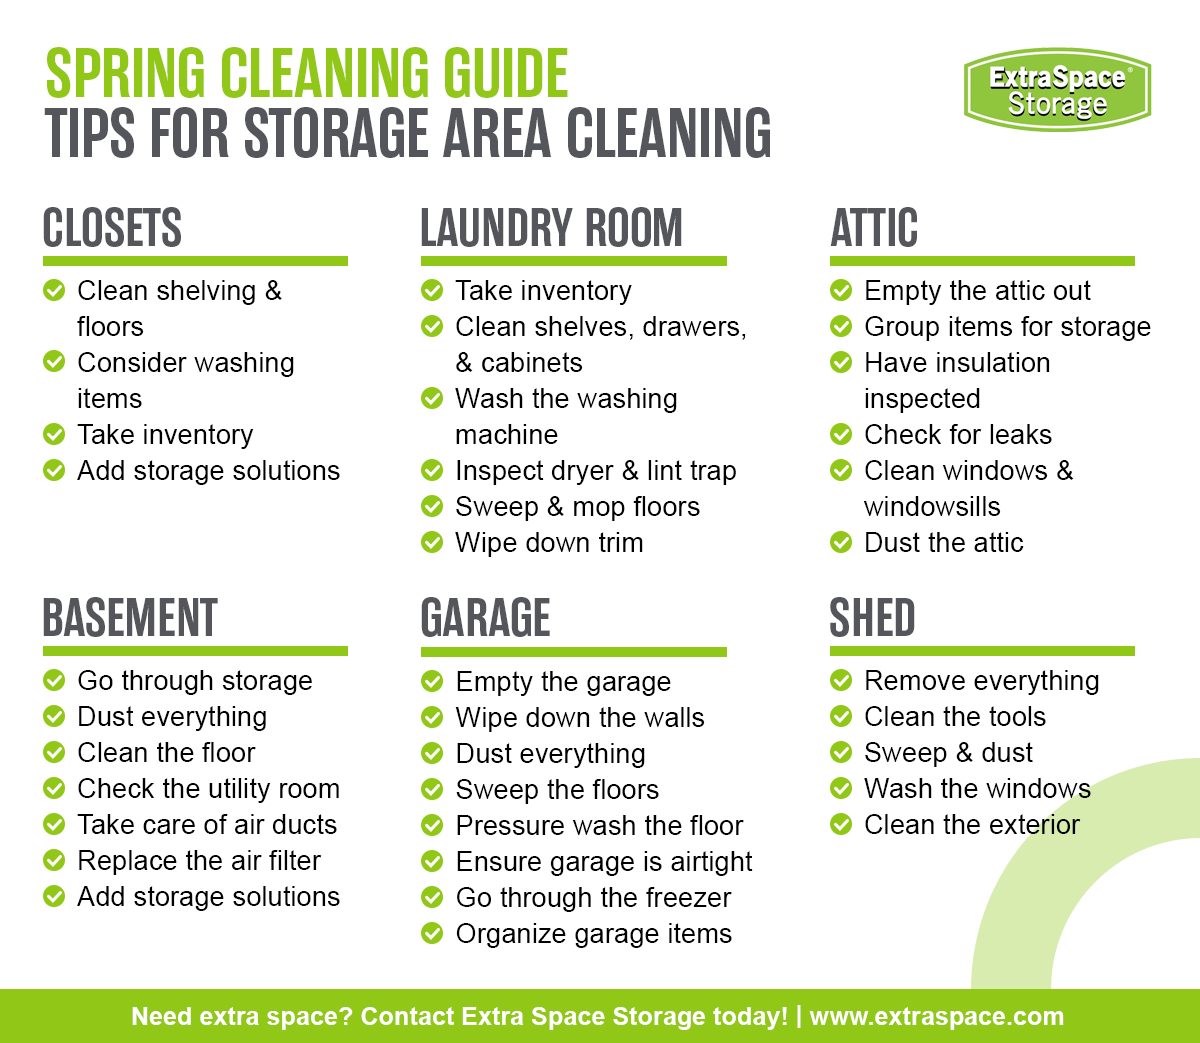
Closets
Coat closets, linen closets, and other storage closets are common dumping grounds. Use your spring cleaning project as an opportunity to finally clean and organize them so you can have the closet of your dreams!
Clean Shelving & Floors
Pull everything out of the closet so that you can dust shelves and clothes rods. Wipe down shelves and cubbies, especially higher ones that are harder to reach and may have more buildup. Then, clean the floors, corners, and baseboards. You might also consider cleaning clothes hangers, boxes, bins, or racks that you have in your closets.
Consider Washing Items
Unwashed items can cause unwanted musty smells in storage closets. Wipe down or wash any coats, jackets, shoes, bags, towels, and other miscellaneous items that have spent a long time in the closet. If you have clothes like suits, peacoats, or dresses that can’t be machine washed, consider dry cleaning them if needed.
Take Inventory
When going through closet storage, think about what items you actually need in that closet. Some items may belong to a different area of your home and need to be moved. If you come across items that you no longer need or use, consider decluttering by donating, selling, or trashing them.
Add Storage Solutions
If you need closet organization tips, consider installing shelves or racks where you can store shoes, bags, gloves, and items you need to grab as you’re heading out the door. If possible, include drawers with dividers to create more separation and help keep your closet free of clutter. You can also maximize every inch of closet space by storing hats, scarves, umbrellas, and towels on the back of closet doors using hooks, coat hangers, or over-the-door organizers.
Laundry Room & Mudroom
Laundry rooms and mudrooms can collect all kinds of dust, dirt, and other debris. While you’re spring cleaning, use this mudroom and laundry room cleaning checklist to give these areas some extra care so that they stay clean and accessible!
Take Inventory
Remove everything from drawers, cabinets, and cubbies so that you can take stock of the items you have in your current mudroom organization setup. Get rid of expired cleaning supplies and pet food, outgrown coats and shoes, and any other items you no longer need.
Clean Shelves, Drawers, & Cabinets
Grab a cloth and some cleaning solution to remove fingerprints, grime, mud, and dust from the outside of these spaces, especially cabinet handles. Open drawers and cabinets and inspect interiors, as well. If there are any spills, clean them up.
Wash the Washing Machine
To clean your washing machine and eliminate buildup and odors, pour one cup of bleach into the machine and run a full hot cycle, pausing it for an hour at the start to let it soak. Once drained, repeat with white vinegar instead—never mix the two, as they produce toxic chlorine gas. Wipe down the gaskets, dispenser drawer, and exterior with a damp cloth, paying extra attention to the rubber door gasket on front-loaders, where mold tends to hide. To prevent odors from returning, leave the door ajar after each cycle. Finally, inspect hoses for bulges or cracks, and tighten the fittings at both ends to guard against leaks.
Inspect the Dryer & Lint Trap
Remove the lint screen and wash it in a sink with soap and warm water, then let it dry completely before putting it back. Use a vacuum attachment to clear lint from the slot the trap slides into. Wipe down the dryer interior with a damp cloth to remove any residue. Finally, for fire prevention, disconnect the exhaust duct from the back of the dryer and vacuum it out—and check that the exterior vent flap opens and closes freely.
Sweep & Mop Floors
Dust and mop the floors, shake out dust and dirt from rugs and other floor coverings, and fix any cracks, scratches, or nicks along the floor. If you can move your washer and dryer, sweep and mop behind and around those areas. If not, use a vacuum attachment or a hand vacuum to get as far in as possible.
Wipe Down Trim
After going over the trim and baseboards with a vacuum attachment—especially the corners and hard-to-reach areas—use a sponge and a combination of dish soap and warm water to scrub away scuffs, stains, and grime. Finish by rubbing a fresh dryer sheet over baseboards to help repel future dust and dirt.
Attic
Did you know that keeping your attic clean can improve your house’s air quality and energy efficiency? Here are some attic cleaning tips to take care of your home storage space and keep your home operating efficiently!
Empty the Attic Out
Remove everything from its storage space and take inventory. Sort items into piles: keep, relocate, donate, sell, or trash. You’ll need your attic to be nearly empty in order to conduct a proper deep clean.
Group Items for Storage
Organize your attic by grouping similar items like holiday decorations or children’s clothes and labeling each storage container with a clear description. Keep a detailed list of what’s stored in the attic so belongings aren’t forgotten over time.
Have Insulation Inspected
Insulation can last for up to 20-80 years, so you don’t need to replace it often. However, insulation can lose its effectiveness over time, and leaks may occur. It’s recommended that you have a professional check the status of your insulation once a year to check for breaks, monitor R-values, and address any issues.
Check for Leaks
Inspect the ceiling for cracks that could be letting in moisture and encouraging mold or mildew growth. If you find issues like mold or water stains, hire a professional to address them. Take a look at your windows to ensure they’re secure and not letting unwanted air or particles inside.
Clean Windows & Windowsills
Spray and wipe down any attic windows, then dust the sills. As you clean, pay attention to unwanted airflow or leaks. If you identify an issue, use DIY window sealing solutions or contact a professional to have it fixed.
Dust the Attic
Start dusting near the ceiling and work your way down, moving from beams and light fixtures to storage shelves and cabinets. Use a durable, flexible microfiber duster that’s efficient and can get into hard-to-reach areas. Once you’ve finished dusting, remember to sweep the floors!
Basement
Whether or not your basement is finished, chances are you’re using a portion of it for storage. Try these cleaning ideas to keep this downstairs storage area neat and tidy!
Go Through Storage
Move all items out of your basement storage area so you can perform a proper deep clean. As you go through items, utilize a home decluttering method to identify what needs to stay, be donated, or thrown out.
Dust Everything
Basements and storage rooms are prone to dust bunnies and cobwebs. Grab a broom to clean ceiling corners and hard-to-reach places. Use a cloth and some cleaning spray to scrub baseboards and walls.
Clean the Floor
Sweep and mop or vacuum the floor to remove unwanted dirt, dust, and spills. If you find any cracks, fix them immediately so debris and liquids don’t get in. If your basement has carpet, it should ideally be cleaned at least once per year. You can hire a professional company, rent equipment, or use a DIY solution to remove stains and smudges.
Check the Utility Room
Examine your furnace and water heater to make sure everything is functioning properly. Consider having a professional come check things out once a year, especially if your units are more than ten years old. Doing so can prevent future breakdowns and prolong the life of your water heater and furnace.
Take Care of Air Ducts
Dead skin cells, bacteria, mildew, and other irritants can collect in your ducts and wreak havoc on allergies, trigger sensitive respiratory conditions, and more. Duct buildup also collects stale odors and blocks airflow, which can make your HVAC system work harder, increase your bill, and impact the environment. Whether you hire a professional or clean your air ducts yourself, add servicing your HVAC system to your spring cleaning to-do list!
Replace the Air Filter
Ideally, your air filter should be replaced every two to three months. Use spring cleaning as your reminder to replace it if you’ve forgotten to do it consistently throughout the year. Even if it has been replaced recently, remove and clean your filter to ensure your home is getting clean air.
Add Storage Solutions
Create and maximize your basement storage space by building or buying basement storage shelving units. Organize your belongings into plastic storage containers, then place labels on them to note the contents. This can help you quickly move through the basement and see what’s in each container.
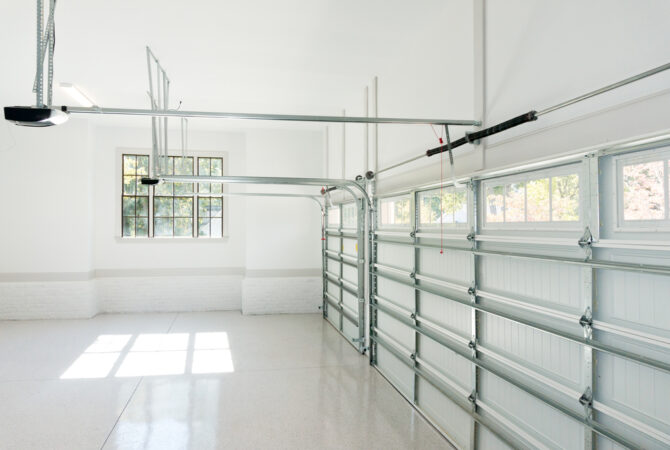
Garage
Shoes, sports equipment, lawn tools, and other household appliances without a permanent home are commonly left in the garage. As the bridge between indoors and outdoors, it’s important to follow a garage cleaning checklist to help keep this space clean and well-organized.
Empty the Garage
When cleaning a garage, start by decluttering and sorting items to determine what needs to stay. Separate garage items into boxes with one of four labels: Storage, Put Away, Donate/Sell, or Trash. Organize the “Storage” items in boxes or on shelves, move the “Put Away” items to their proper places in your home, place the box of things to donate near your door or in your car, and dispose of the “Trash” box.
Wipe Down the Walls
Take a microfiber cloth or wet cloth to wipe down garage walls so they’re free of smudges and stains. This step is essential if you plan on painting your garage in the near future.
Dust Everything
Use a vacuum to remove dust and cobwebs from the walls, especially in the corners. Then, use cleaning spray and a towel or cloth to wipe shelves, cabinets, and other surface areas. Don’t forget to dust the items you’ve temporarily taken out of your garage, too!
Sweep the Floors
Starting from the back of the garage, use a push broom to move dirt, dust, and debris out of the garage. Once the unwanted residue is in your driveway, sweep it up with a conventional broom and put it in the garbage.
Pressure Wash the Floor
Clean oil stains, ground-in dirt, and other debris out of your garage floor with a pressure washer. If you don’t own a pressure washer, you can rent one from a hardware or home improvement store like Ace Hardware or Home Depot. Start by washing the floor with warm water and detergent, then break out the pressure washer. Begin at the back of the garage and move forward to make sure you’re pushing everything outside.
Ensure the Garage Is Airtight
Check that your garage is completely sealed to help it maintain a consistent temperature and prevent unwanted dust and pests from entering. Start with the garage door, as broken or slack garage door springs can allow insects, dirt, rainwater, and more into the garage. Examine your garage door’s torsion springs and consider replacing them if your door doesn’t stay completely closed. Inspect the entire garage for air leaks or drafts and fix them with a spray-on foam or sealant.
Go Through the Freezer
If you keep a deep freezer in your garage, spring cleaning provides the perfect opportunity to clean it out. Make a list of everything in your freezer, throw out food that’s gone bad or has freezer burn, and place any remaining good food in a cooler to preserve it. If frost has built up, unplug the freezer and leave the door open to let it defrost, placing towels on the floor to catch the meltwater. Once defrosted, wipe down the interior and exterior with a cleaning solution and ensure it’s completely dry before plugging it back in and returning everything to its designated spot.
Organize Garage Items
There are many ways to organize a garage, so try out a few new storage systems while cleaning and replacing items. Install hooks and racks on the ceiling for bikes and canoes. Hang lawn equipment, ladders, and any large sports equipment on the walls. Incorporate a pegboard to store tools and bags, or invest in a tool chest. And consider adding metal or plastic shelving to create vertical storage.
Shed
A deep clean each spring can help keep your shed from becoming a mess of tools, garden hoses, and more. Check out these ways to clean and organize your shed to keep it in top shape!
Remove Everything
Take all items out of the shed and determine what needs to go back in. Throw away broken equipment and donate tools you never use. Try to group seasonal items together—like snow shovels, snowblower, and boots in one area, and gardening tools and patio furniture in another.
Clean the Tools
Use the blast setting on your garden hose to remove caked-on dirt from tools. Fill a bucket with warm, soapy water and let tools soak for about 30 seconds, then rinse and dry them right away. When using tools in the future, try to clean them immediately after use. They’re much easier to clean in the moment than when dirt and mud has time to build up.
Sweep & Dust
Use a broom to knock down cobwebs from ceilings and in corners. Dust all surfaces, shelves, and countertops. Remove dust, dirt, and grass clippings from the shed floor with a push broom. While you’re at it, check walls and corners for any signs of mold and mildew.
Wash the Windows
Spray the interior of each window with a vinegar-and-water solution or commercial window cleaner, then wipe dry with a lint-free cloth—this may take two or three passes to remove all smudges. For the exterior, first rinse with a hose, then scrub with a sponge and vinegar-and-water solution. Finish with a rubber-bladed squeegee, working top to bottom, and dry any remaining moisture with a towel.
Clean the Exterior
Cleaning your shed regularly helps prevent mildew growth and removes stains before they become permanent. Use a power washer or garden hose to spray off dirt, mud, and stains from the exterior. Note that the best approach may differ depending on whether your shed has wood, vinyl, aluminum, or metal siding—make sure to check the manufacturer’s recommendation. If you’re running into sticky materials like tree sap, spray the area with white vinegar, let it sit, then scrub it away.
***
Need more space at home while spring cleaning? Extra Space Storage has convenient storage facilities across the country that can help you declutter while you deep clean. Find a storage facility near you!