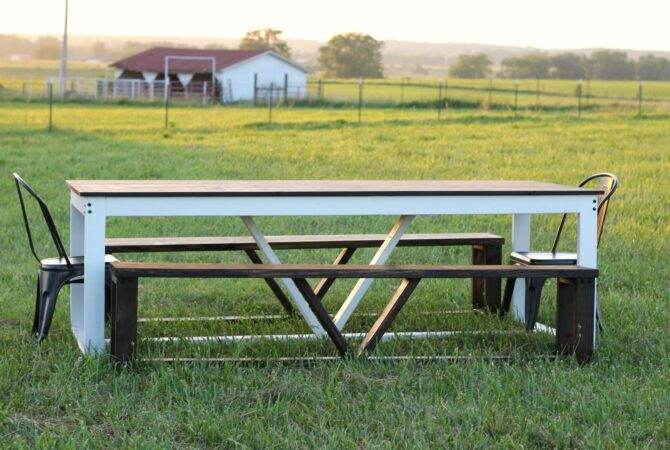
Want to know how to build a farmhouse table? Our beginner-friendly guide will show you how to create your own beautiful table without the high cost of store-bought furniture. Combine modern furniture design and classic farmhouse appeal within your interior design by building this DIY farmhouse table!
Supplies Needed:
The following materials listed will create one farmhouse table measuring 40″ wide by 96″ long that can sit up to ten. We encourage you to adjust these supply and cut lists as needed to create your desired table length and width.
Material dimensions are written as Thickness x Width x Length—please note we use nominal sizes, rather than actual lumber sizes.
- ¾”x20″x 8′ wood panels (x2)
- 2″x4″x8′ wood boards (x13)
- 2″ wood screws (1 box)
- 4 ½” heavy-duty wood screws (1 box)
- 6″ heavy-duty wood screws (1 box)
- 3″ wood screws (1 box)
- Wood glue
- Wood stain
- Old rags
- Wood sealer
Tools Needed:
- Circular saw
- Miter saw
- Drill
- Speed square
- Tape measure
- Pencil
- Clamps
- Sandpaper or sander
- Gloves
- Protective breathing mask
- Optional: Table saw
- Optional: Fan
Cut List:
All of these cuts come from 1½” x 3½” x 8′ boards—or 2″x4″x8′, nominally.
- Tabletop (Step 2)
- Tabletop Surface Boards: uncut ¾”x20″x 8′ (x2)
- A Boards: 27 ⅞” (x2)
- B Boards: 34 ⅞” (x2)
- C Boards: 84 ¼” (x2)
- Legs (Step 3)
- D Boards: 29 ½” (x4)
- E Boards: 35″ (x2)
- EE Boards: 35″ (x2)
- F Boards: 87 ¼” (x2)
- Notched Support (Step 4)
- BB Boards: 34 ⅞” (x2)
- V Brace (Step 4)
- V Boards: 30″ with both ends cut at a 33° angle (x2)
- Support Brace (Step 4)
- Custom measurement
Use caution when using power tools. Follow all manufacturer’s instructions and wear proper safety gear. There will be scrap wood left over from some of these cuts.
Step-by-Step Instructions for a DIY Farmhouse Table
Once you’ve gathered the tools and materials needed for your project, you can begin to build your own farmhouse table by following the steps below! With the materials and instructions given, you’ll create a 40″-wide by 96″-long farmhouse table that can sit up to ten.
Please verify your own measurements to fit the material and farmhouse table project you are working on. These measurements are only a guide.
Step 1: Plan Your DIY Farmhouse Dining Table
When you start out on a new DIY project, it’s vital to consider your home and unique needs. Ask yourself the following questions before finalizing your farmhouse table plans:
- Is this table the right size for my space? Do I need to adjust the measurements to make it bigger or smaller?
- Do I have all the tools I need on hand, or do I need to borrow or buy new equipment?
- Should I adjust the cut or material list to customize the project to my preferences?
- Is my workspace big enough to complete this project safely?
- What type of wood should I use for this project?
- How long will this project take to finish?
All of these questions can help you tailor the project to your needs and preferences. After deciding on your DIY dining table plans, set up a workspace with all your materials—and if needed, cover your workspace to help protect against scratches, glue, or sawdust.
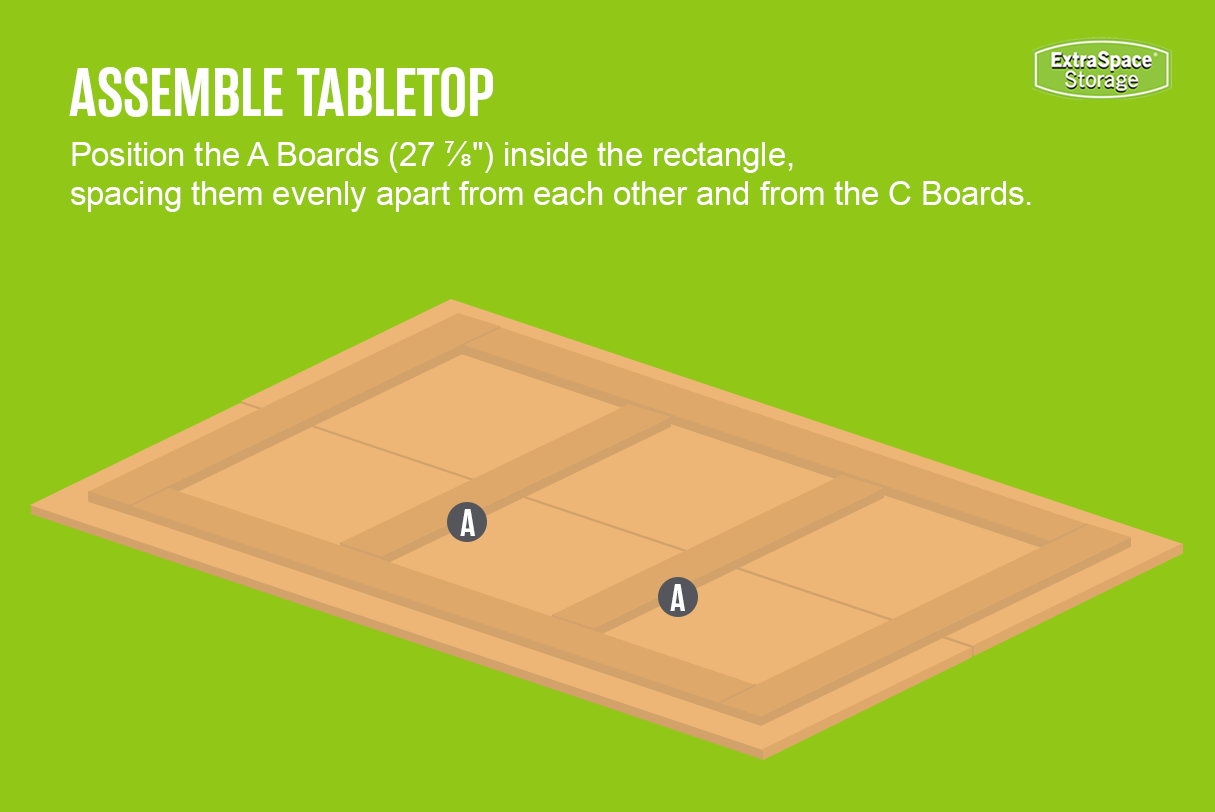
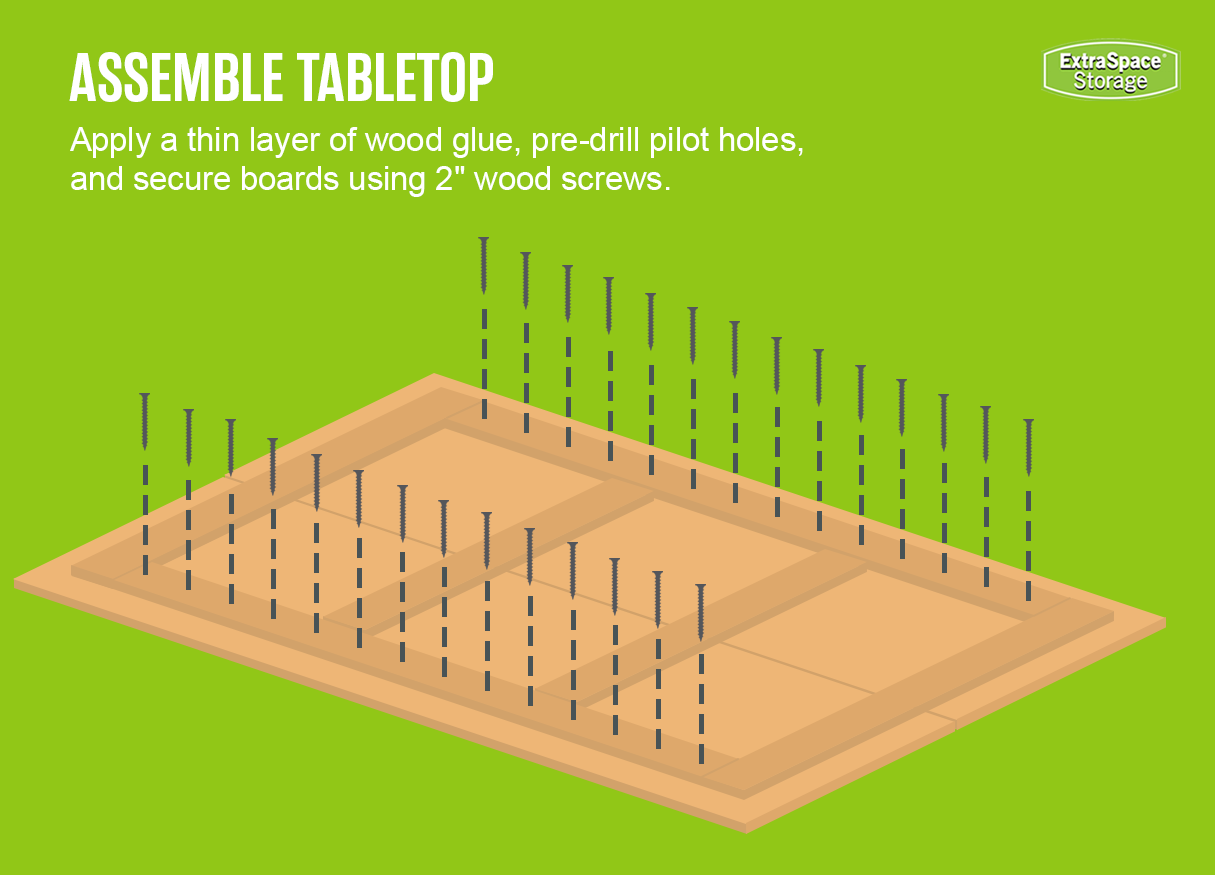
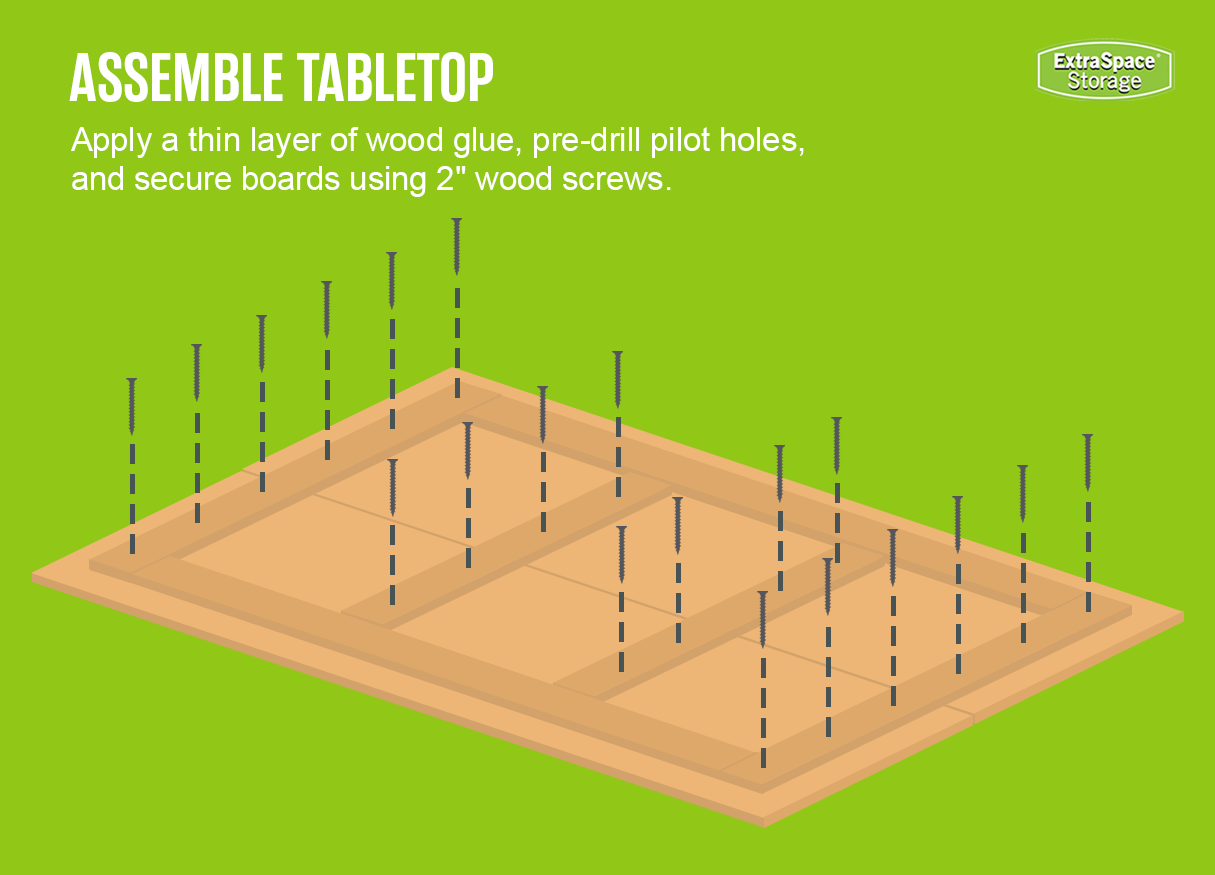
Step 2: Assemble the Tabletop

The first step in this project is building the farmhouse tabletop. Creating a sturdy top will make attaching the legs later much easier and ensure a stable final piece. Follow these instructions to create the tabletop:
- Place the two ¾” x 20″ x 8′ wood panels (Tabletop Surface Boards) side by side. Ensure they’re flush and aligned with each other to form the top of the table.
- Skip this instruction if you’ve completed the Cut List. Grab four 8′ 2x4s. Measure and then cut two 27 ⅞” pieces (A Boards), two 34 ⅞” pieces (B Boards), and two 84 ¼” pieces (C Boards).
- Position the two C Boards (84 ¼”) near the outer edges of the Tabletop Boards. Then, position the two B Boards (34 ⅞”) perpendicular to the C Boards to create a rectangle. The ends of the B Boards should sit as an extension of the C Boards, not nestled in-between. Finally, position the A Boards (27 ⅞”) inside the rectangle, spacing them evenly apart from each other and from the C Boards.
- Apply a thin layer of wood glue to the contact points on the Tabletop Boards and the A, B, and C Boards. Clamp these contact points together to ensure even pressure along the drying glued surfaces.
- Pre-drill pilot holes* into each A, B, and C Boards into the Tabletop Surface Boards every six inches for a secure hold. Drill 2″ wood screws into the pilot holes to fasten the support boards to the tabletop.
*Drilling pilot holes will help prevent the wood from splitting when you drill in your screws. We recommend pre-drilling for pilot holes for each screw that needs to be used for this table.

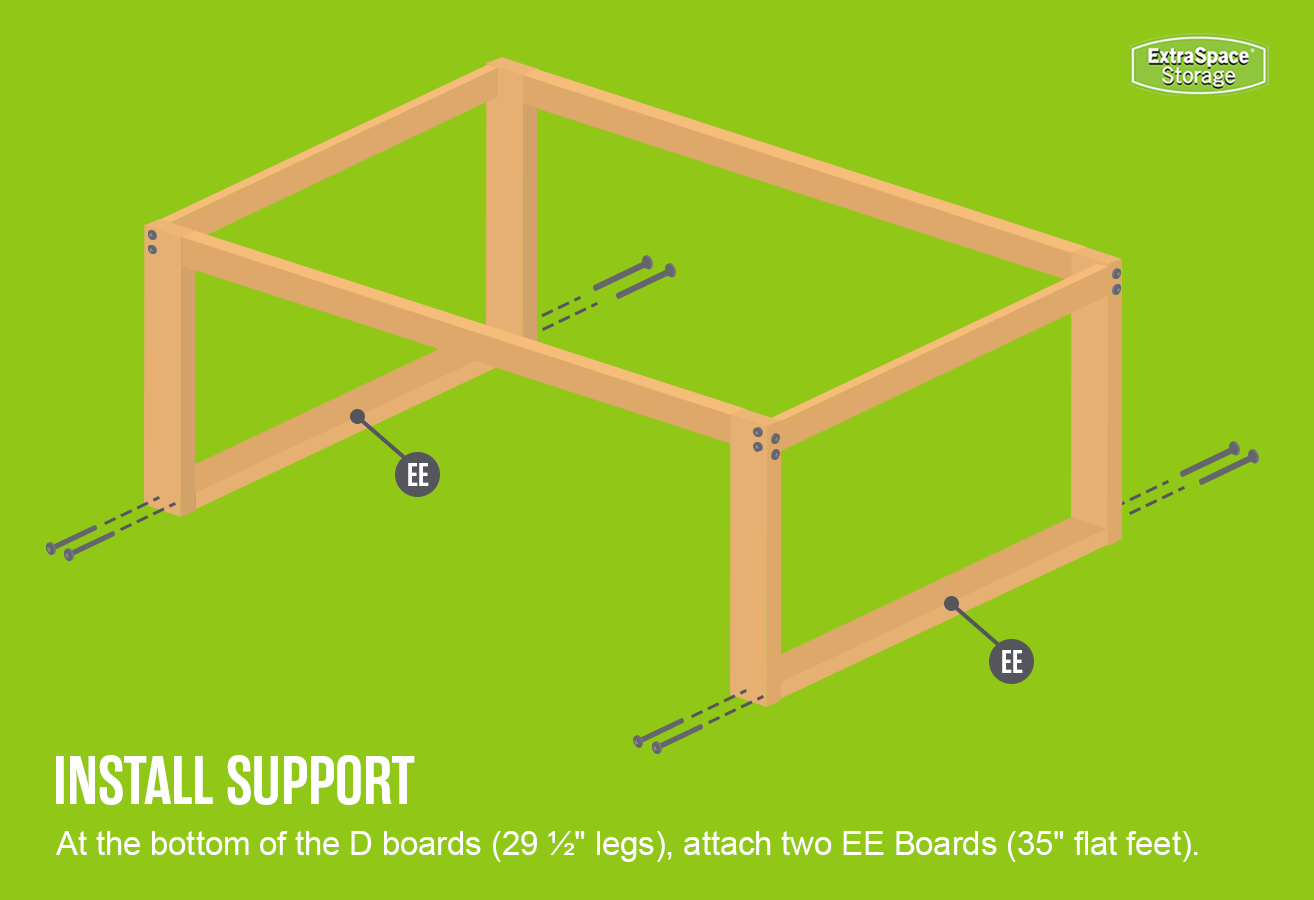
Step 3: Build Your Table Base

Now that the tabletop is complete, it’s time to build a sturdy base to support it. Here’s how to make a base that will be both durable and stylish.
- Skip this instruction if you’ve completed the Cut List. Grab six 8′ 2x4s. Make four cuts, each 29.5″ long (D Boards) for the table legs. Make four 35″ boards next—two of these will be E Boards and two will be EE Boards. Make two 87 ¼” long (F Boards).
- Follow the next instructions using the tabletop as a guide, but do not attach any boards to the tabletop: Use a speed square to properly align the legs and mark their position: The D Boards should be slightly inset from the tabletop edges, positioned flush against the B and C support boards that were attached to the underside of the tabletop in Step 2.
- Attach the four D Boards (29 ½” legs) to either side of the two E Boards (35″ short ends of the table base). These pieces form part of a frame that will be attached to the tabletop at the end of Step 4. Secure D and E Boards with 4 ½” heavy-duty wood screws—leave room to stagger screws that will go the other direction to ensure they don’t hit each other inside the legs.
- Attach the D Boards (29 ½” legs) to the two F Boards (87 ¼”), which will serve as the long sides of the table base. These boards connect the legs and provide additional support. When both the E and F Boards are attached to the D Board legs, they form a rectangular base around the A, B, and C support boards of the tabletop. Add stability by drilling 6″ heavy-duty wood screws from the D Boards into the F Boards, staggering them with the screws from the previous instruction.
- At the bottom of the D boards (29 ½” legs), attach two EE Boards (35″ flat feet). Ensure the flat side touches the ground for extra leg support and to support the upcoming long support board.
Step 4: Add Extra Support

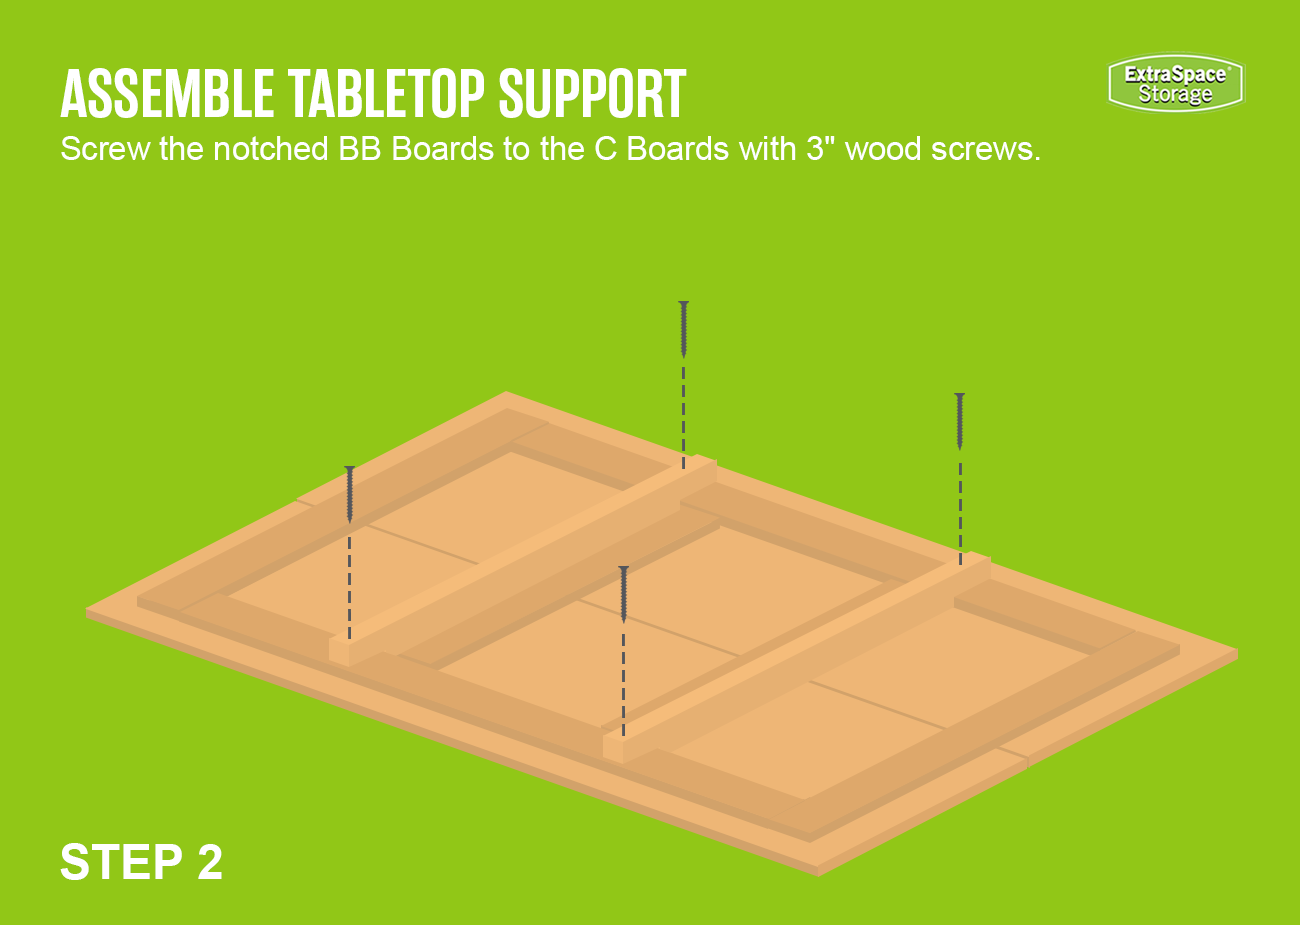
Now that you’ve built the base, it’s time to strengthen everything with additional support. Use these directions to add additional support to your DIY table:
- Skip this instruction if you’ve completed the Cut List. Grab one 8′ 2x4. Cut out two 34 ⅞” pieces (BB Boards). Notch the two BB Boards (34 ⅞”) to fit over the C Boards. The long side of the BB boards will fit snugly on the outsides of the A Boards while the short side has the notch and fits over the C Boards. Screw the notched BB Boards to the C Boards with 3″ wood screws.
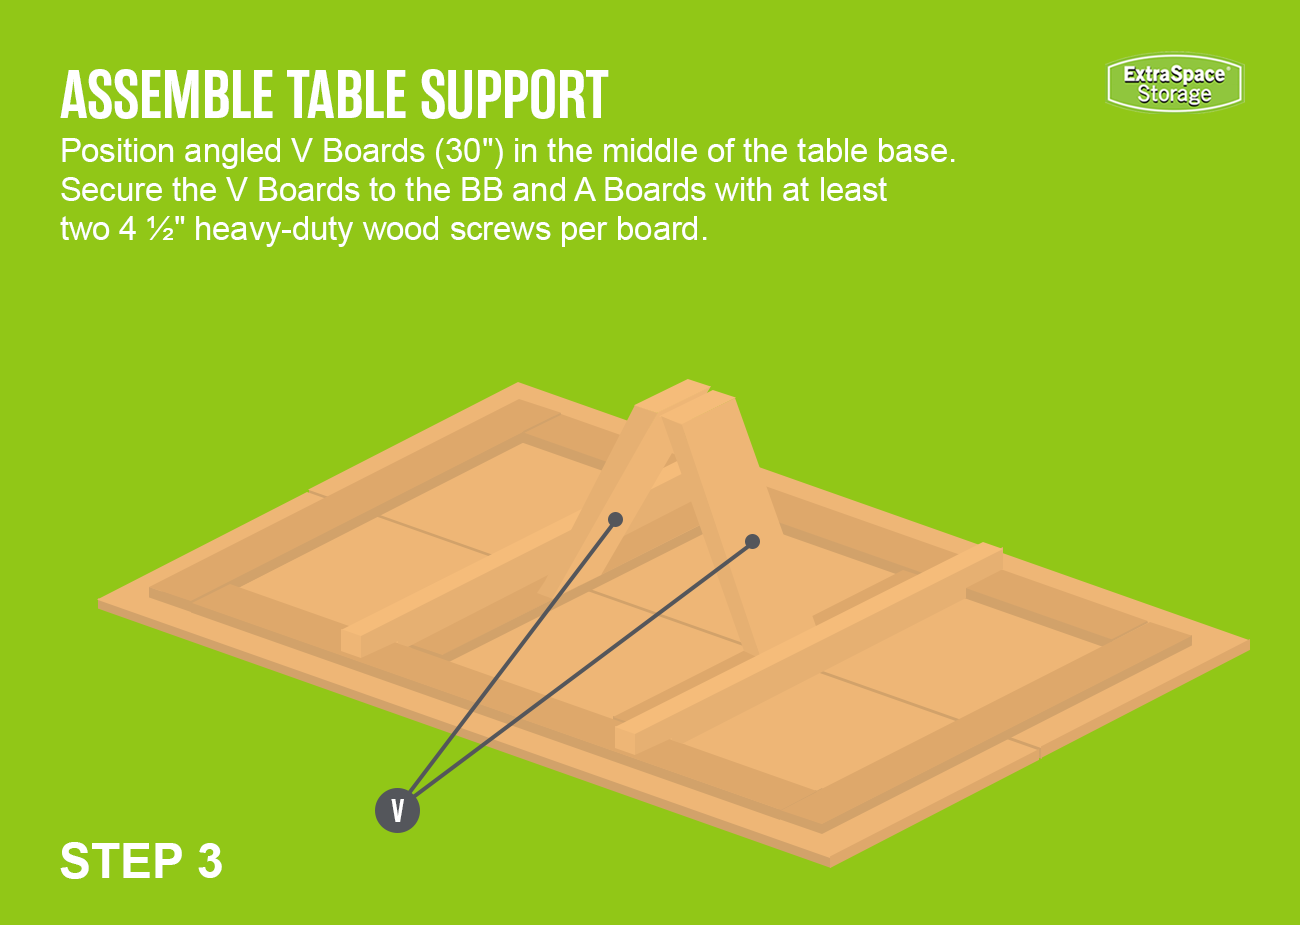
- Skip this instruction if you’ve completed the Cut List. Grab one 8′ 2x4 board and cut two 30″ pieces (V Boards). Angle both ends of each board to fit together in a V shape by setting your miter saw to cut each end at a 33-degree angle (or adjust as needed for a snug fit based on your table’s dimensions).
- Grab the angled V Boards (30″) and position them in the middle of the table base. Each board should connect to the table base opposite each other, where a BB Board and an A board meet at a right angle. Secure the V Boards to the BB and A Boards with at least two 4 ½” heavy-duty wood screws per board. The opposite ends of the V Boards should meet in the center, forming a V-brace.
- Finally, measure the distance between the EE Boards. From one 8′ 2x4, cut a board the length you just measured (“Support Brace”). Use clamps or a friend to hold up the Support Brace while you drill 6″ heavy-duty wood screws from EE Boards into the Support Brace. This board should sit flush against the bottom of the V-brace, but you won’t attach them yet.
Note that the table base is still not attached to the tabletop at this point—though the V-brace is. By keeping these two components separate, you’ll be able to lift the table base off for easier sanding and staining of each piece.

Step 5: Sand, Paint, & Stain Your Table
For the next step of this farm table blueprint, separate your tabletop from your base. This will make sanding and staining your farmhouse table a simpler process, since you won’t have to work with awkward angles that would be present if the pieces were attached.
- Prepare your wood for sanding and staining by removing any dust, dirt, or other debris.
- Sand all surfaces evenly to smooth out rough spots. Wipe everything down to remove any dust before staining the wood.
- Apply the stain to the wood and wipe excess off with rags.
- After each coat of stain has been applied, wait around two hours—or use a fan—for it to dry before applying another coat.
- Once you’ve stained your wood to your liking, apply wood sealer to protect your farmhouse table’s finish. Follow the wood sealer’s label for application and dry time.
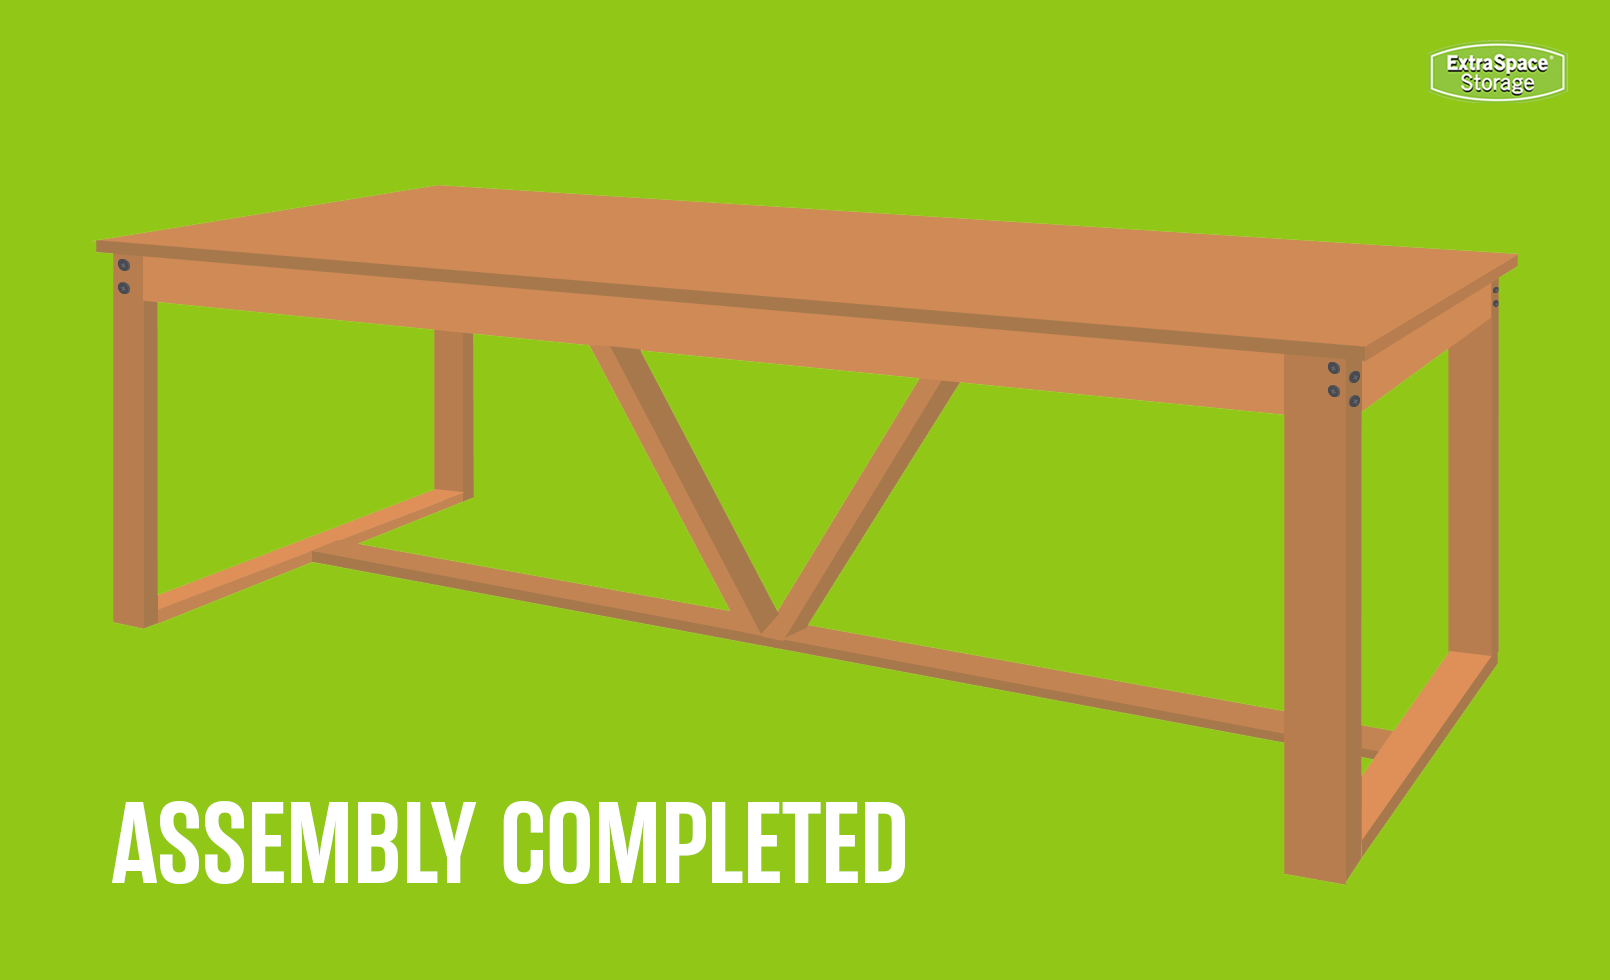
Step 6: Assemble Your DIY Farmhouse Table
One of the final steps in building your farmhouse table is assembling the pieces after they have been sanded, stained, and sealed.
- Start by placing the base onto the upside-down tabletop, ensuring it is centered and evenly aligned.
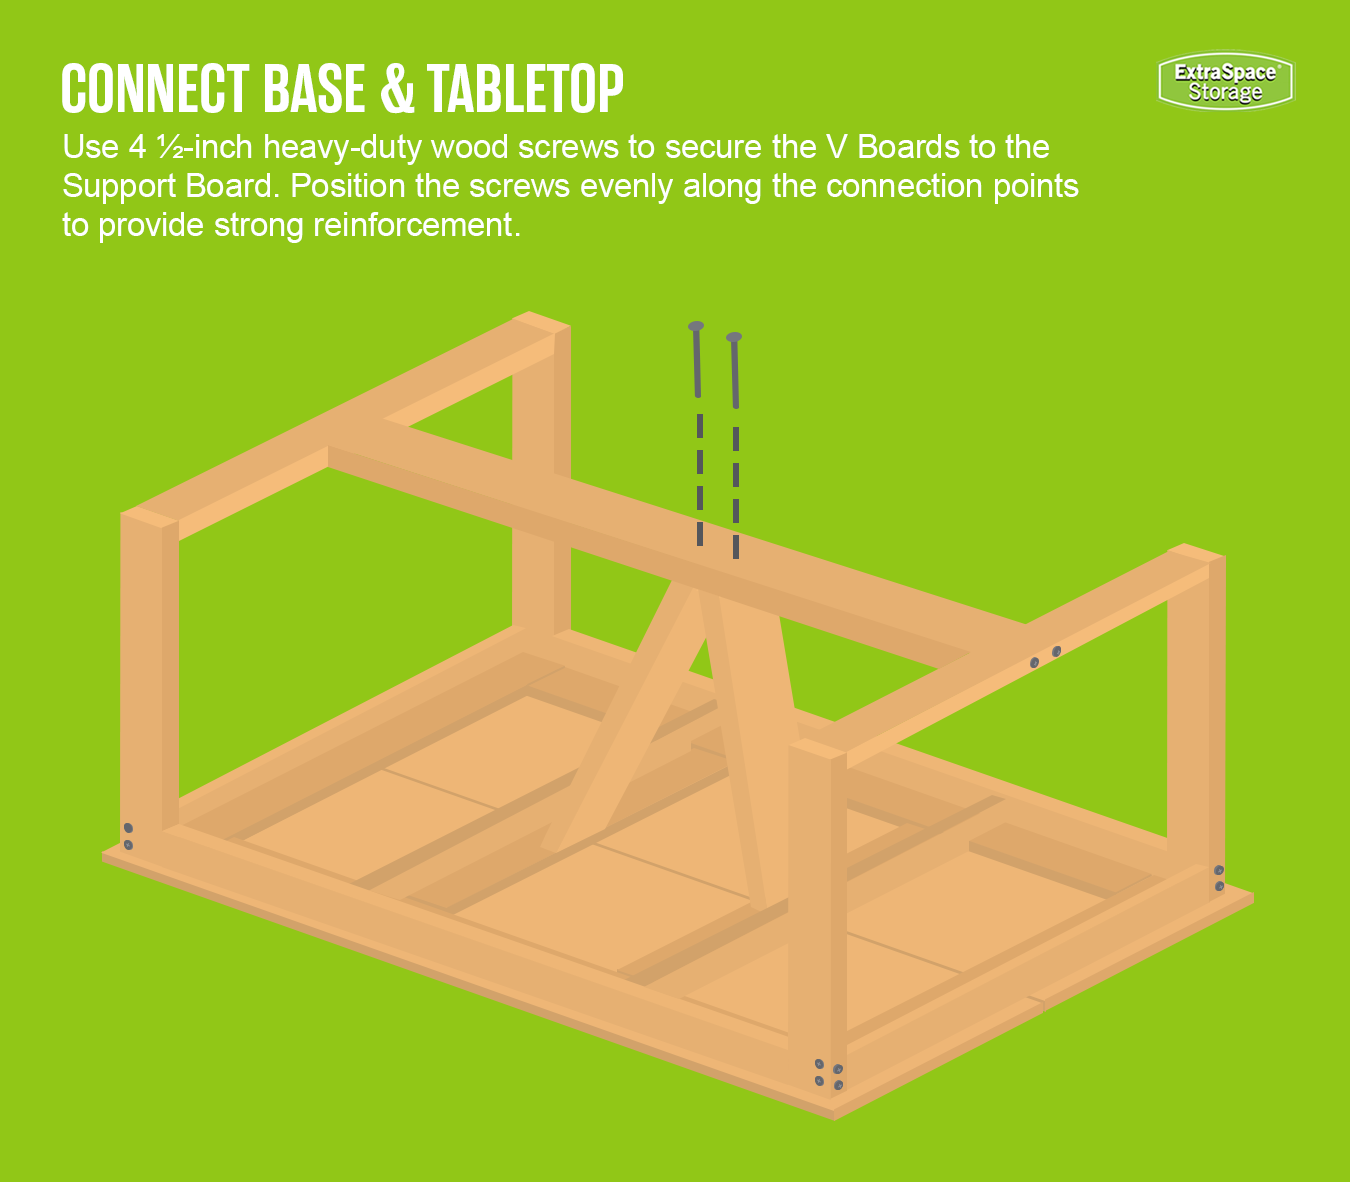
- Next, attach the V-brace to the Support Board. The angled ends of the V Boards should meet at the center, forming a V-shape, while their angle-cut ends should sit flush against the center of the Support Board. Use 4 ½-inch heavy-duty wood screws to secure the V Boards to the Support Board. Position the screws evenly along the connection points to provide strong reinforcement. At each point where the V Boards meet the Support Board, use at least two screws to reinforce the structure.
- Finally, ensure all screws are tightened securely to prevent movement and improve the table’s overall stability.
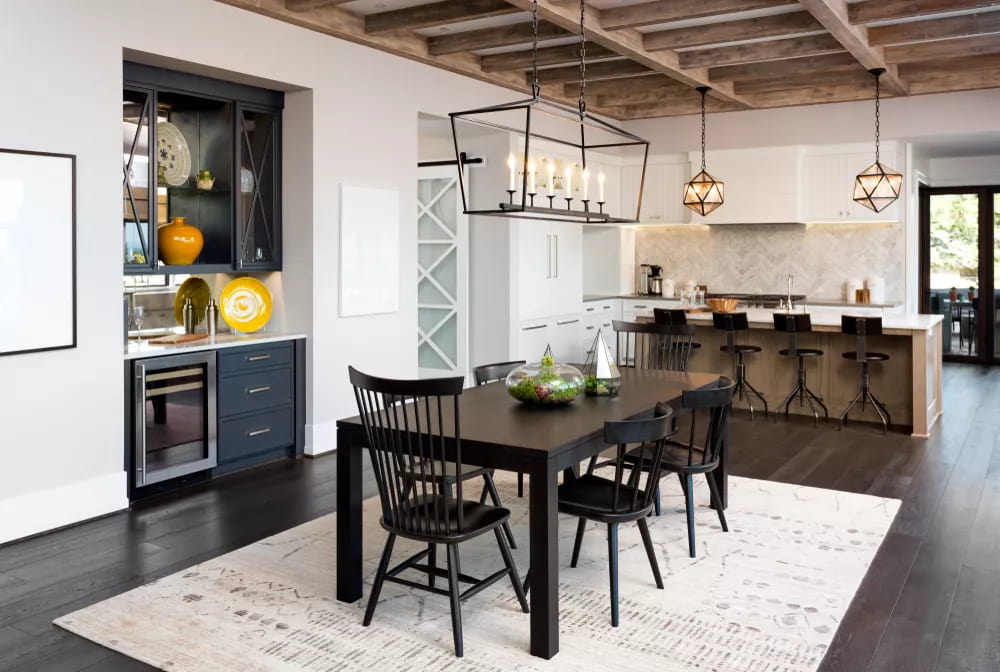
Decor Tips for a DIY Farmhouse Table
Now that you’ve built your farmhouse table, it’s time to complete the look with decor that enhances its rustic charm. From styling your table itself to transforming the space around it, these farmhouse decor ideas will help you give your kitchen or dining area a farmhouse-style makeover!
Incorporate Greenery for a Farm-to-Table Feel
Complement the warmth of your wooden farmhouse table with fresh greenery or floral arrangements. Adding plants to your dining space enhances your table’s rustic charm while bringing a touch of nature indoors. Though you can use any plants you want, white flowers like peonies, anemones, or roses are especially great for a welcoming and authentic farmhouse look. Consider displaying them in rustic containers—like metal buckets for a rustic farmhouse vibe or white ceramic vases for a cozy, inviting touch.
Layer Textures on Your Farmhouse Table
When designing a rustic dining room or kitchen, layering textures can add depth and personality to the space. Mix materials like wood, stone, fabric, and dried florals in your decor to create visual interest. A burlap, lace, or cotton table runner can add warmth and contrast to a dark wood table. Additionally, use cloth napkins in varied fabrics, repurposed containers for storage, and a mix of natural materials to help create an inviting, lived-in feel. The key to a farmhouse aesthetic is embracing imperfections and avoiding uniformity while keeping things functional and organized.
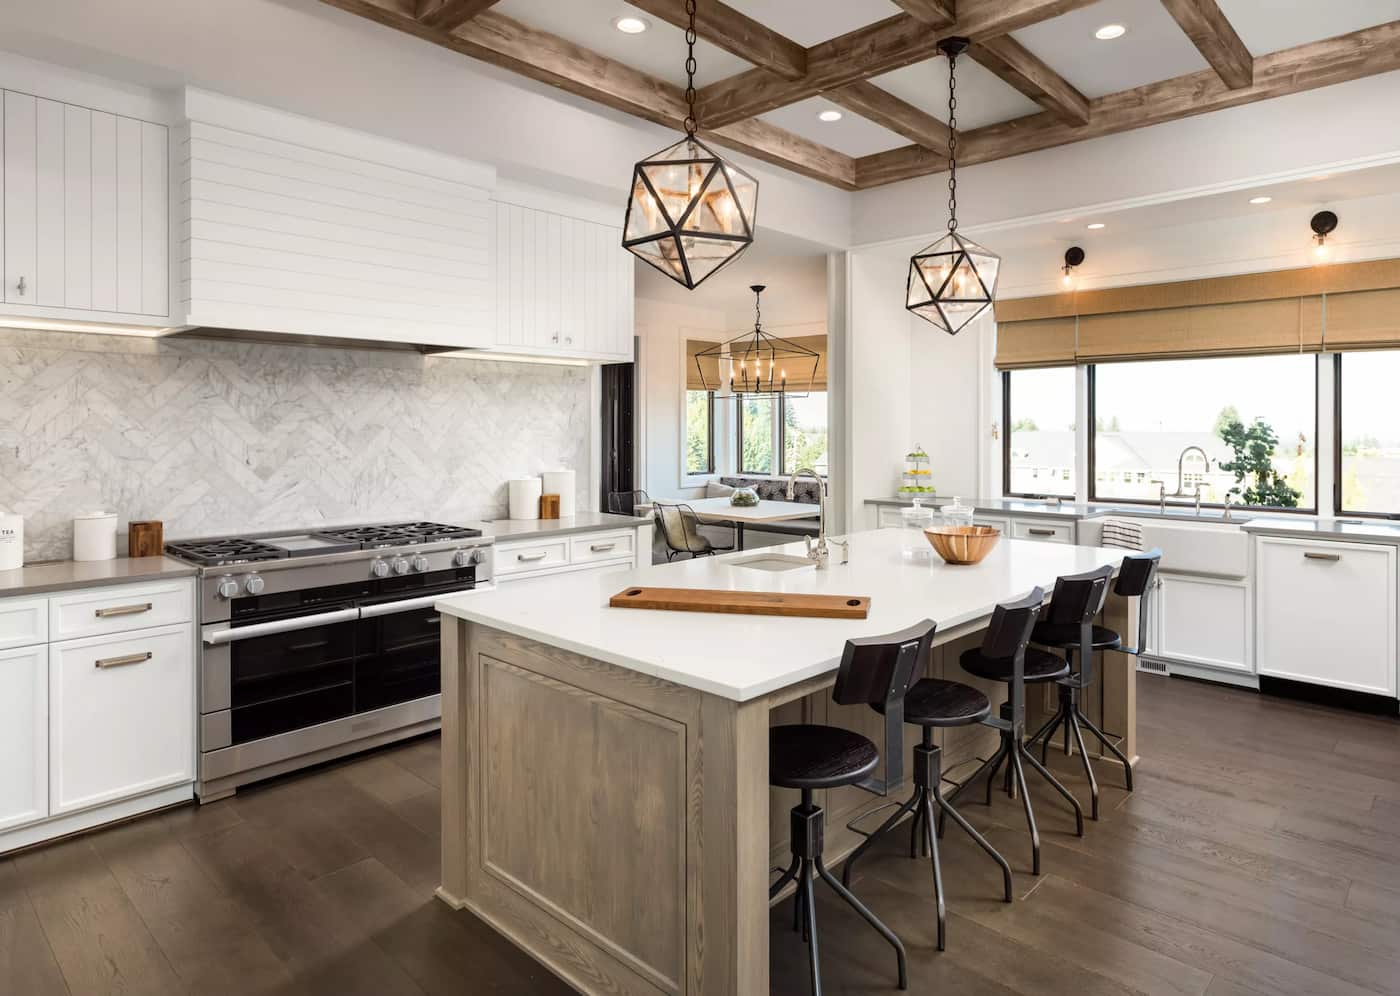
Enhance the Space with Thoughtful Lighting
Lighting plays a crucial role in accentuating your farmhouse table. To make your dark wood table stand out, consider incorporating neutral decor elements and painting the surrounding walls in lighter tones that reflect the light instead of absorbing it. For fixtures, opt for rustic farmhouse lighting options like overhead chandeliers, lantern-style lights, or pendant lamps with weathered finishes—and don’t forget about candles for mood lighting! Layering a few different light sources can add warmth, texture, and depth to your dining space.
Complement Your Table with Proper Seating
Once you have your DIY farmhouse table, you’ll need to pair it with the right seating to complete the look. Mix and match different seating styles—such as a combination of wooden chairs and benches—to create a welcoming and functional setup. Popular farmhouse-style seating includes options like antique ladder-back chairs, upholstered seats, and repurposed or DIY farmhouse benches that add character and a sense of history to your dining space.
Consider a Variety of Place Settings
Your farmhouse table is a blank canvas for creative place settings. Experiment with a variety of colors, textures, and materials—such as stoneware, ceramic, or wooden plates, accompanied by cotton or linen napkins. For a personalized touch, use vintage silverware, handmade napkin rings, or seasonal decor to refresh the look throughout the year. Swap out table settings for different holidays, incorporating things like DIY Thanksgiving or holiday decor for a cozy and festive atmosphere.
***
Need a place to store your belongings or extra materials while making a farmhouse table? Extra Space Storage has facilities throughout the U.S. that can help! Find cheap self storage near you.