moving guide
How to Pack Pictures for Moving Without Damaging Them

Whether you're hiring a professional mover or doing a DIY move, photos are among the most vulnerable items you'll be packing. Without proper protection, you can end up with cracked glass, discolored prints, or damaged frames. And, unlike furniture or household decor, your personal photos can't be easily replaced. In this guide, you'll learn how to pack pictures for moving so everything arrives at your new home in the same condition it left in.
Picture Packing Supplies You'll Need
Before you start, gather all of the supplies you'll need to safely pack your pictures. Having everything within reach will help you work more efficiently.
Painter’s tape
Packing paper
Bubble wrap
Cardboard corner protectors
Picture or mirror boxes
Cardboard sheets
Glassine paper or acid-free tissue paper
Acid-free photo boxes
Packing tape & a marker
You may see advice suggesting using newspaper when packing pictures for moving, but it's not ideal—the ink transfers to glass, frames, and photo surfaces, and the paper itself is acidic enough to accelerate yellowing in photographs and prints over time.
How to Pack Framed Pictures
As with packing paintings and artwork, any picture with a glass front is susceptible to damage. Here's how to pack picture frames without breaking or damaging them or the photos inside.
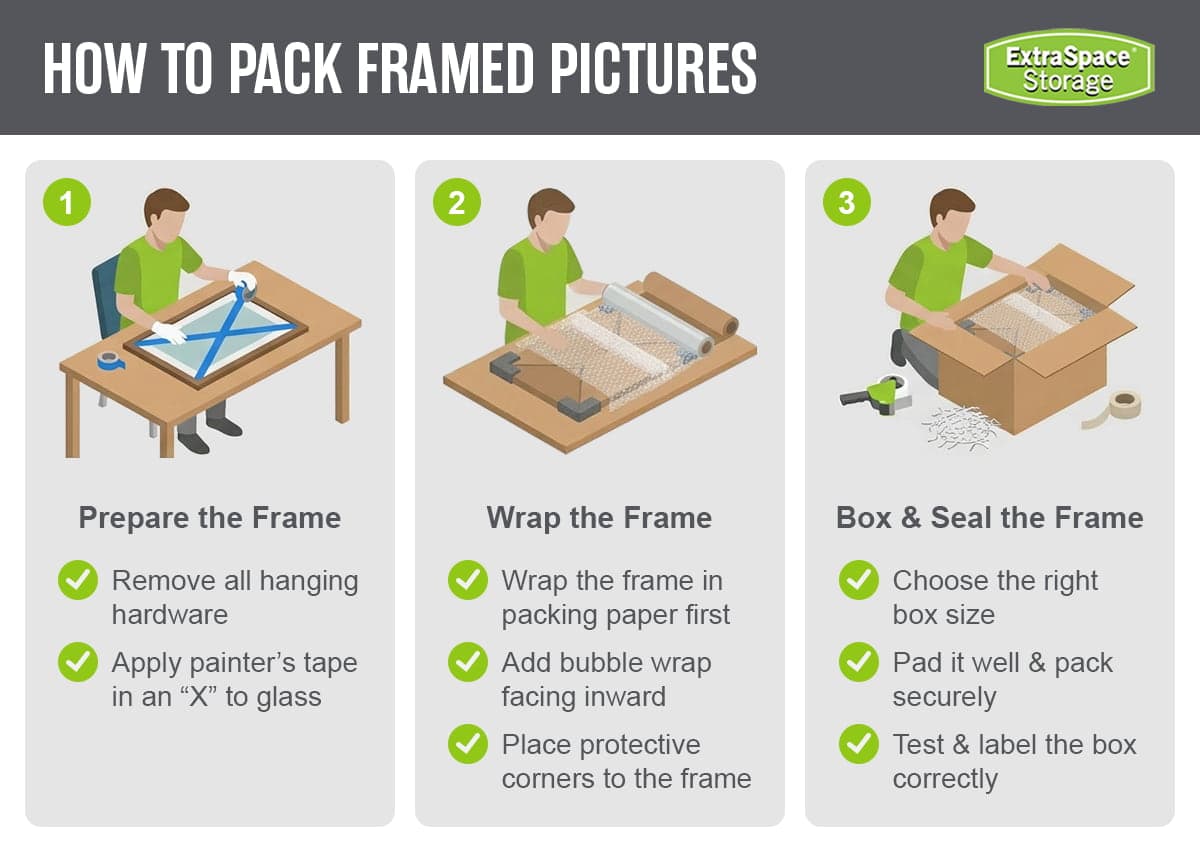
Prepare the Frame
Start by removing any hanging hardware from the back. Hooks, D-rings, and loose wire can snag through wrapping or scratch adjacent pieces during loading. Then use painter's tape to make a large X across the glass, pressing firmly to the inner edges of the frame on all four sides. This helps protect the glass so breakage is less likely—plus, if it does happen to crack during transit, the tape holds the pieces in place to help prevent them from scratching the photo below.
Wrap the Frame
Lay a large sheet of packing paper on a flat, clean surface and place the frame face down at the center. Wrap it the way you would a gift, folding the edges in and securing the seams with tape. Follow that with a full layer of bubble wrap with bubbles facing inward, against the frame. Packing pictures with bubble wrap in this way keeps the air pockets in direct contact with the surface they're cushioning and protects the bubbles themselves from being punctured by external contact. Finish by clipping or taping corner protectors onto all four corners before boxing.
Box & Seal the Frame(s)
When choosing moving boxes for pictures, look for options slightly larger than the wrapped frames so that you'll have enough clearance for padding, but not so much that the frames can shift. Crumple packing paper into the bottom of the box to create a base layer, slide the frame in vertically, and fill any remaining space around the sides and top until nothing moves. Smaller frames can be packed together if they’re separated with cardboard sheets, but photos in large frames are best packed individually for proper protection. Before sealing, close the box and give it a firm but gentle shake. If you feel or hear movement, open it and add more padding. Label every side with "Fragile" and mark the top with "This Side Up."

Find Affordable Self Storage Near You
Extra Space Storage has over 4,000 locations across the U.S. with friendly customer service, advanced security features, and affordable month-to-month rates.
- Save up to 50% off online
How to Pack Loose Photos & Photo Albums
Loose photographs and photo albums tend to get packed last and quickly, but they deserve more care than that—especially since they're often irreplaceable. Before you start, do a quick sweep of the places photos tend to accumulate, like desks, nightstands, bookshelves, storage closets, and the attic or basement. Gathering everything in one place first means nothing gets left behind or tossed in a random box where it could be bent or damaged.
Loose Photographs
Start by placing glassine paper or acid-free tissue paper between photos to keep them from sticking to one another or scratching each other. To store them, place them flat in an acid-free photo box. Tape the lid closed before placing the photo box inside a larger padded moving box. If you have several boxes, make sure to organize your photos and label them with contents and date ranges, and pack them together in one large outer box rather than leaving them loose. If you have extra time, consider creating digital backups of important photos to add an extra layer of protection before your move.
Photo Albums & Scrapbooks
Wrap each album individually in clean packing paper and stack them flat in a box, with a sheet of packing paper between each album to prevent covers from rubbing during transport. If you have partially filled albums, use the packing process as an opportunity to consolidate loose prints into them so everything is organized and protected in one place.
Digital Photo Frames & Storage Devices
If you have a digital photo frame, treat it like any other small electronic. Remove any SD cards or USB drives and pack them separately in a labeled resealable plastic bag so they don't get lost in transit. Wrap the frame itself in bubble wrap and pack it in its original box if you still have it, or in a snug-fitting box with padding on all sides. For CDs and flash drives containing photos, pack them in a hard-sided case or wrap them individually in bubble wrap to protect against cracking or bending. Keep them with your essentials rather than in the moving truck if possible—like printed photos, the files on them can't always be recovered if something goes wrong.
Loading & Transporting Safely
Once you've carefully packed your photos, you'll need to load them properly onto the moving truck or into your car to help them stay protected throughout the trip. Keep picture boxes upright at all times—flat-loading concentrates pressure across the glass and exposes the weakest face of the box. Additionally, wedge them between large flat furniture like dressers, headboards, and bookcases, which act as natural bumpers and prevent tipping during turns or sudden stops. Don't stack anything on top, since even light pressure can crack glass or damage frames—and keep boxes away from heavy or sharp-edged items that could shift during the drive. It's also crucial to avoid leaving photo boxes in a hot car or moving truck for extended periods—heat and humidity can cause prints to warp, stick together, or fade, even over the course of a single afternoon. If there's a gap between your move-out and move-in dates, consider renting a climate-controlled storage unit to protect your photos from temperature and humidity swings until you're ready to unpack.
***
Looking for a safe place to store your pictures while you transition to your new home? Extra Space Storage has conveniently located storage facilities with handy amenities like climate control so you can safely store your items. And check out our other moving resources to help your home relocation go smoothly. Find storage near you today!

Author Profile
Quinn Johnson
Quinn Johnson is a moving expert and author for Extra Space Storage. He's moved over 15 times, including internationally, and helped countless others between their own homes. He's happy to lift some boxes for a friend as long as he's paid in pizza. As a writer and content creator for Extra Space Storage since 2019, Quinn shares helpful moving tips and info to alleviate the common stresses of moving.


