If you live in a small house or studio apartment, you know finding household storage space takes a bit of creativity. Wooden crates are a simple catch-all storage solution that adds rustic charm to any room. This guide will help you learn how to build a wooden crate to spruce up your home!
Supplies Needed:
The following materials listed will create one wooden storage crate measuring 30″ long x 18 ⅛” wide x 16″ high. We encourage you to adjust this supply list as needed to create your desired crate size.
Material dimensions are written as Thickness x Width x Length—please note we use nominal sizes, rather than actual lumber sizes.
- 48″x40″ pallets (x2)
- 8′ 1x2 boards (x3)
- 31″-long rope, roughly ⅜” thick
- 1″ brad nails
- 2″ brad nails
- Safety goggles
- Protective gloves
- Hammer
- Wedge
- Wood glue
- Nail gun
- Tape measure
- Drill
- Hand, table, or miter saw
- Sandpaper or hand sander
- Wood stain or white spray paint
- Cloths (if staining)
- Optional: White primer
- Optional: Wood sealant
- Optional: 3″ Caster swivel wheels (x4)
- Optional: 0.5″ wood screws for casters (1 box)
Cut List
- From pallet pieces
- 30″ (x8) – crate exterior
- 15″(x8) – crate exterior
- 15⅛” (x8) – crate floor
- From 1″ x 2″ x 8′ boards
- 29″ (x2) – crate base
- 12⅛” (x2) – crate base
- 15¼” (x4) – crate legs
- 13⅝” (x2) – crate frame
- 26″ (x2) – crate frame
Use caution when using power tools. Follow all manufacturers’ instructions and wear proper safety gear. There will be scrap wood left over from some of these cuts.
Step-by-Step Instructions for a DIY Wooden Crate
Are you considering building a wooden crate? After gathering the necessary tools and materials, you’re ready to start! These DIY crate plans are versatile and their size can be adjusted based on your needs—be sure to adjust your cut list accordingly. Follow the steps below to craft a DIY wood crate from scratch.
Step 1: Disassemble Pallet & Cut Wood
By upcycling a pallet, you first need to disassemble it before reusing the wood for your project. Put on your safety glasses and gloves before placing the pallet front-down on the ground. Hammer a wedge into the individual wooden slats to carefully pry them from the pallet’s frame, working slowly to avoid breaking the wood. Once the boards are loose, use the back of a hammer to remove the nails. Always make sure to wear safety glasses and protective gloves to avoid splinters. Next, use a miter saw or table saw to cut the pallet’s wood to the following specified lengths for your wood crate:
- Cut eight 30″-long pallet pieces for the sides of the crate. Set aside. Cut eight shorter 15″ pallet pieces for the ends. Set aside. Your final cut from the pallet is to create eight 15⅛” pieces for the crate bottom.
- Grab your three 8-foot 1″ x 2″ boards and cut two 29″ pieces. Cut two 12⅛” pieces. Set aside—these will be your crate base.
- Create the crate legs by cutting four 15¼” pieces. Set aside.
- Create your crate’s frame by cutting two boards measuring 13⅝” and two 26″ boards. Set these four boards aside.
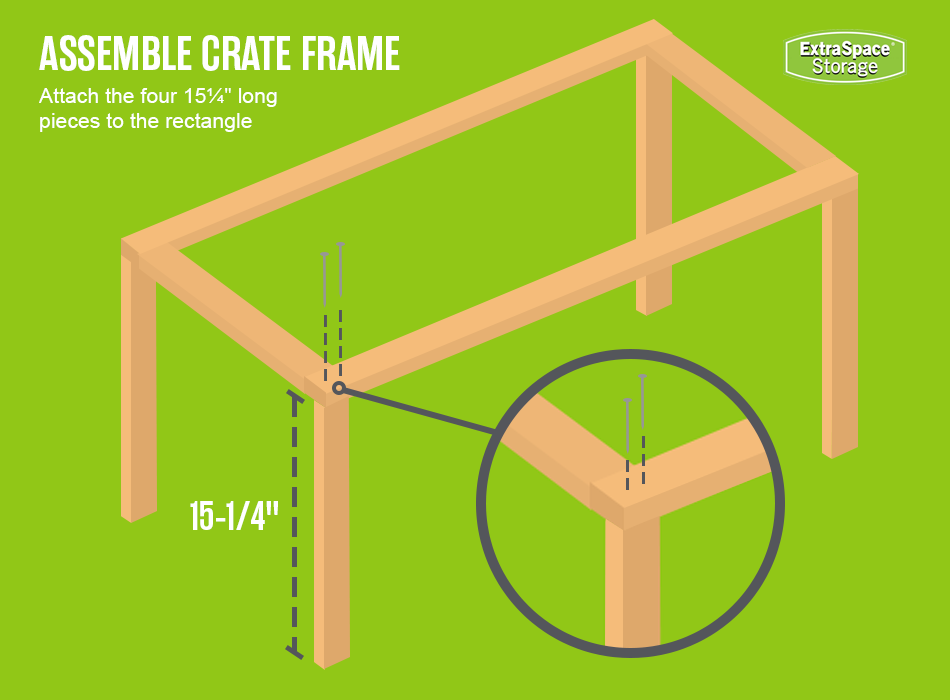
Step 2: Assemble Your Crate Base
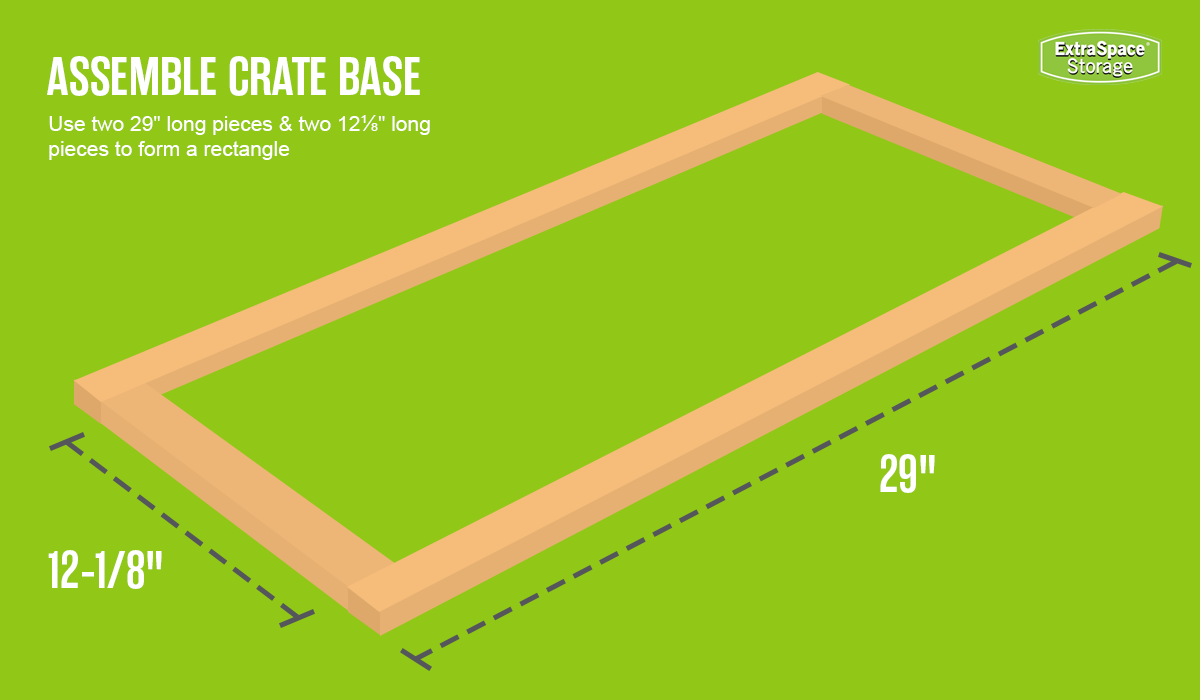
- Grab two 29″ long pieces and two 12⅛” long pieces to form a rectangle for the bottom. Position the 12⅛” pieces between each end of the 29″ pieces. Use a nail gun to secure them with two 2″ brad nails per corner, nailing from each 29″ board into the 12⅛” pieces.
- Attach the four 15¼” pieces perpendicular to the bottom rectangle to form the sides of the frame. Place the widest part of each 15¼” piece facing outward. Nail through the 15¼” pieces into the 12⅛” vertical boards, using two 2″ brad nails at each corner.
- Attach two 13⅝” long pieces to each end, perpendicular to the 29″ and 15¼” boards. Use the nail gun to nail two 2″ brad nails from the 13⅝” pieces into the ends of the 29″ bottom boards.

Step 3: Attach Pallet Boards to Crate Sides
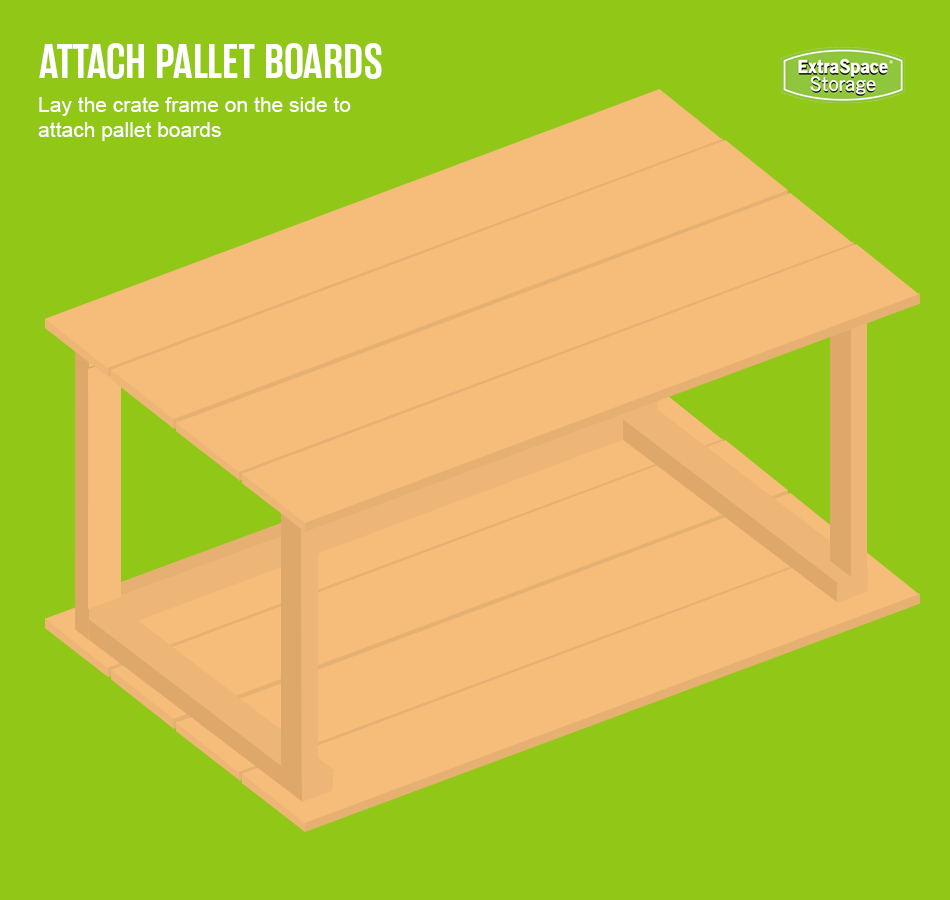
- Lay the crate frame on the side.
- Attach the 30″ long pallet boards with wood glue, 1″ brad nails, and a nail gun—as you work, use the 15″ long pallet boards as a guide to ensure boards are straight and evenly spaced.
- Flip the crate over and repeat on the opposite side.
- Attach the 15″ long pallet boards to both ends with wood glue, 1″ brad nails, and a nail gun.

Step 4: Assemble & Reinforce Crate Floor
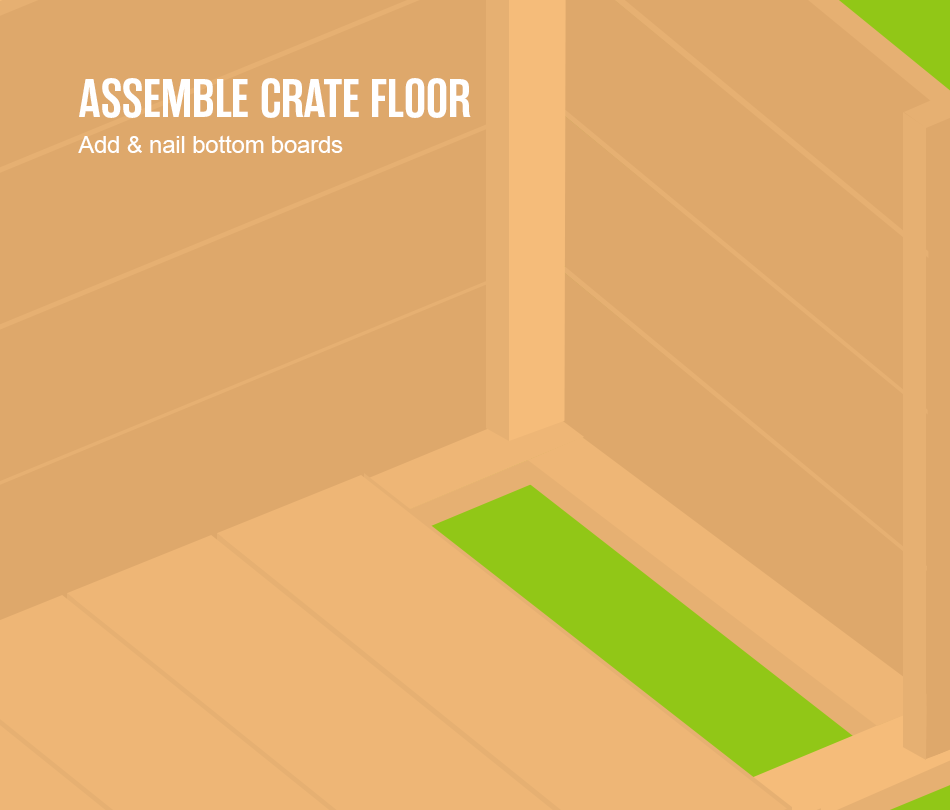
- Flip the crate over, so that the original rectangle you created is on the ground. This will serve as the base for the crate’s floor.
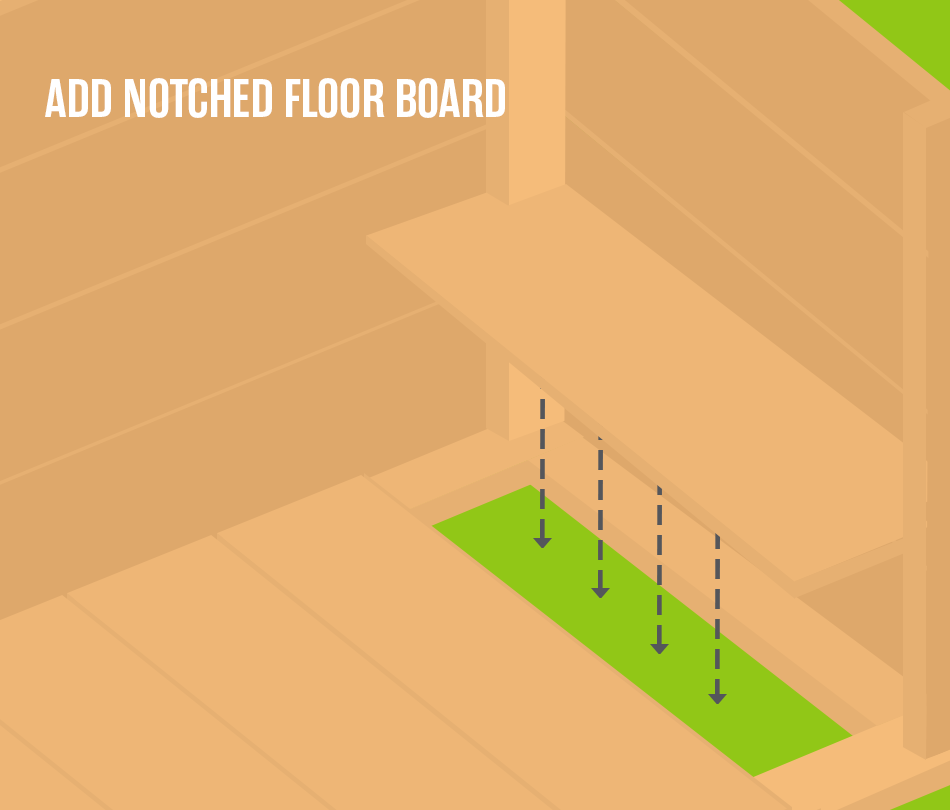
- Grab the 15⅛” long pallet boards. Fit them inside for the crate’s floor—notch the corners of the two end pieces so they fit properly around the 15¼-inch leg pieces.
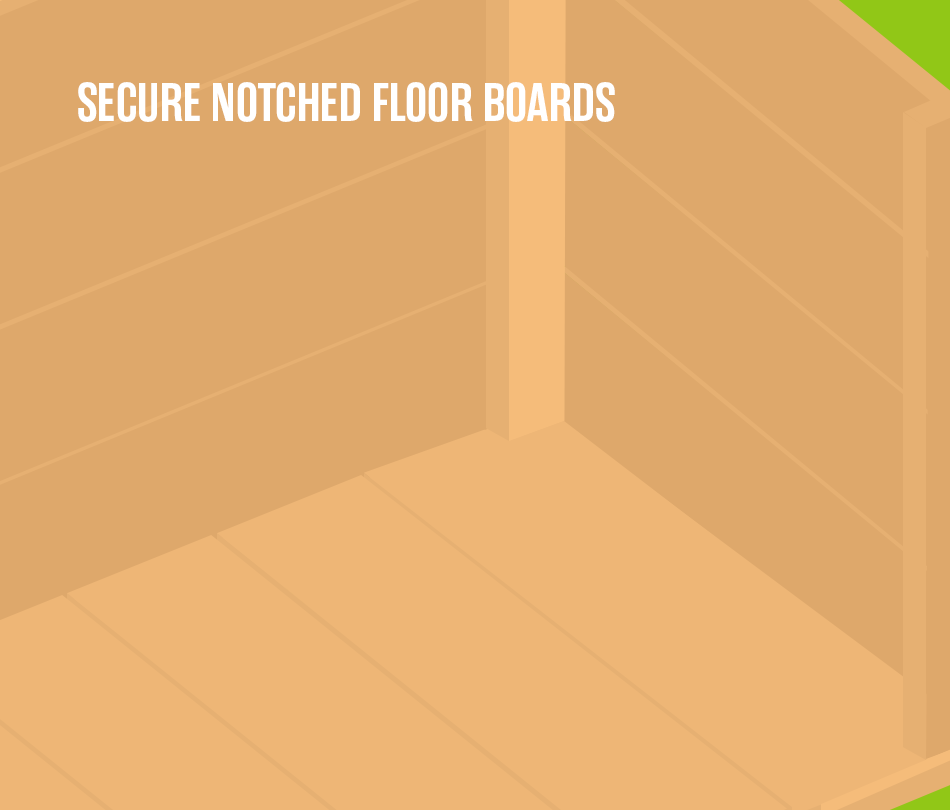
- Apply wood glue to the back of each floor board and use a nail gun with 1″ brad nails to attach them to the bottom frame. Nail through each floor board into the 29″ and side 12¼” pieces of the crate frame, placing two 1″ brad nails per board.
- To complete and reinforce your wooden pallet crate, attach the two 26″ long boards along the insides of the crate at the top, positioned so they make a rectangle with the 13⅝” frame pieces. Use a nail gun with 1″ brad nails to secure them to the 29″ pallet boards.
Step 5: Drill Holes to Add Rope Handle
Adding wooden box rope handles is an optional step that can improve the functionality and look of your crate. An easy way to do this is by drilling two 1″ holes roughly three inches from each end of the crate, about an inch down from the top. Though that’s typically where crate handles are placed, you can adjust the placement to suit your preference. Drilling before painting or staining and adding the rope after will help prevent any stain from getting on the rope handles or having the rope obscure your work.
Step 6: Sand & Stain or Paint Your Crate
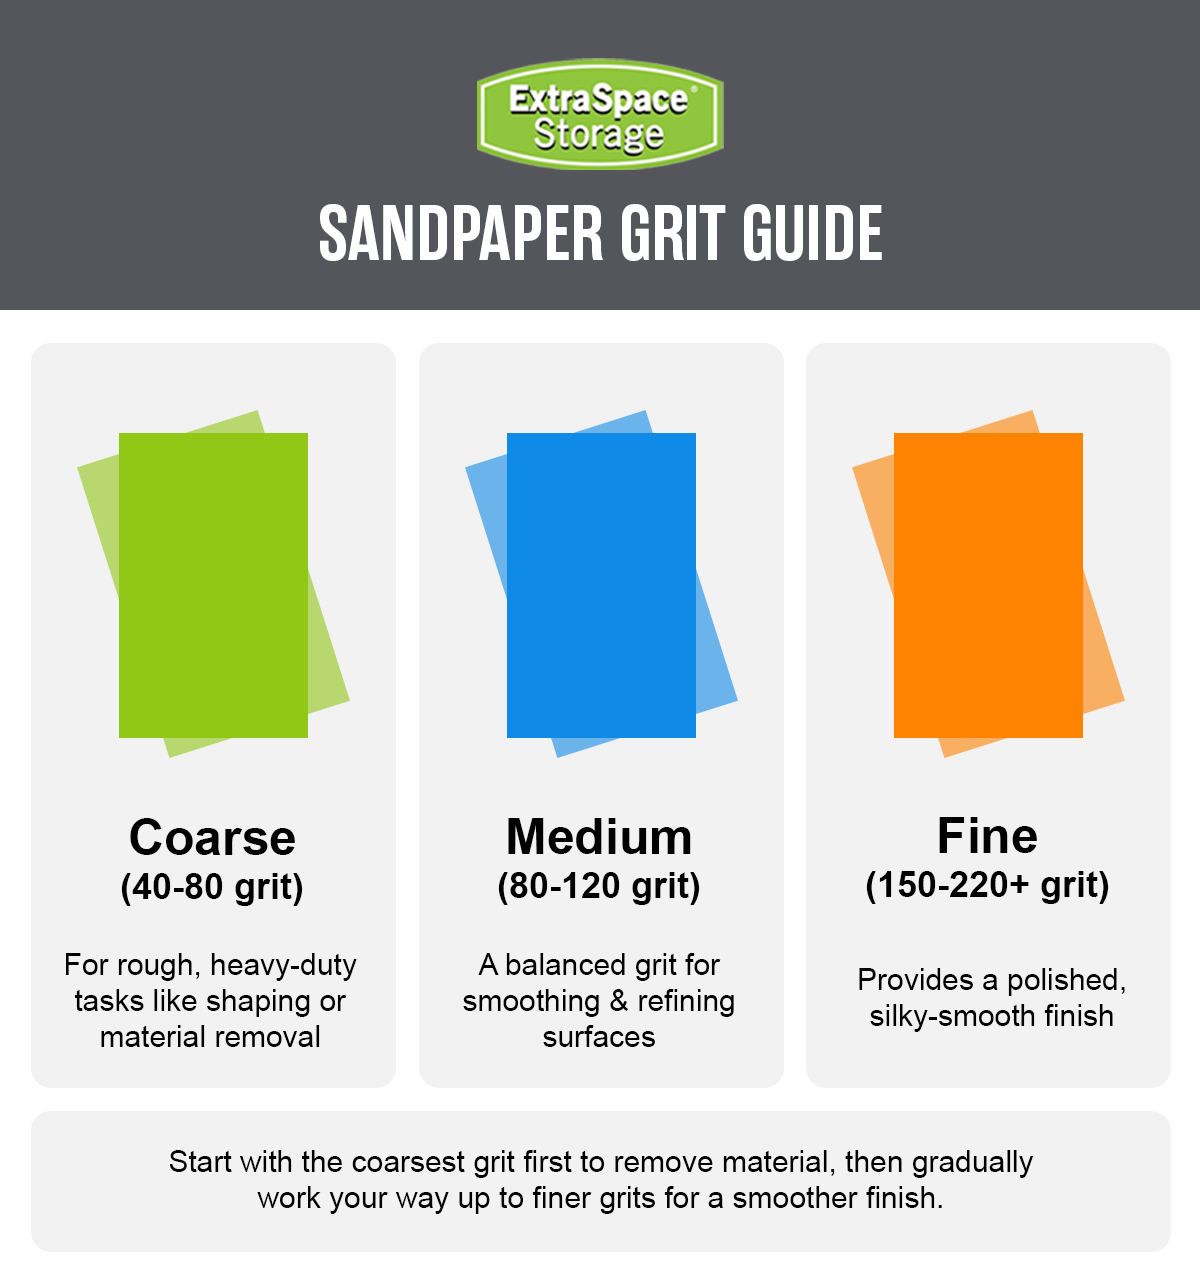
Before sanding or painting, you’ll want to prepare your wood by wiping down dust, dirt, and other debris with a damp cloth. Check for any rough spots or splinters and carefully sand your crate—a smooth finish is important if you plan to stain or paint with a brush. Have plenty of sandpaper on hand, as pallet wood can be particularly rough. Make sure to wear protective gloves and operate in a properly ventilated area.
Since pallet wood is difficult to stain, the easiest way to add personality to your DIY crate build is by painting. Here are a few key steps to paint your wood crate.
- Apply a white primer base—you may need multiple layers to create an even surface. Apply your ideal color with a paintbrush, roller, or spray paint, depending on your desired finish.
- Allow the paint to dry completely before applying a second coat for full coverage.
- Sand the painted surface lightly for a rusted look. Focus on the edges and raised areas.
- Apply a clear sealant—if storing outdoors, consider a waterproofing spray or clear sealant to protect against moisture and UV damage.
If you opt to stain your wooden crate, these are some instructions you should follow.
- Apply the stain in the grain’s direction with a dry cloth.
- Use a second clean cloth to wipe off any excess stain, again working in the grain’s direction.
- Sand the painted surface lightly for a rusted look. Focus on the edges and raised areas.
- Apply a clear wood sealant or varnish to preserve color and provide a polished look.
Step 7: String Rope Handles Through
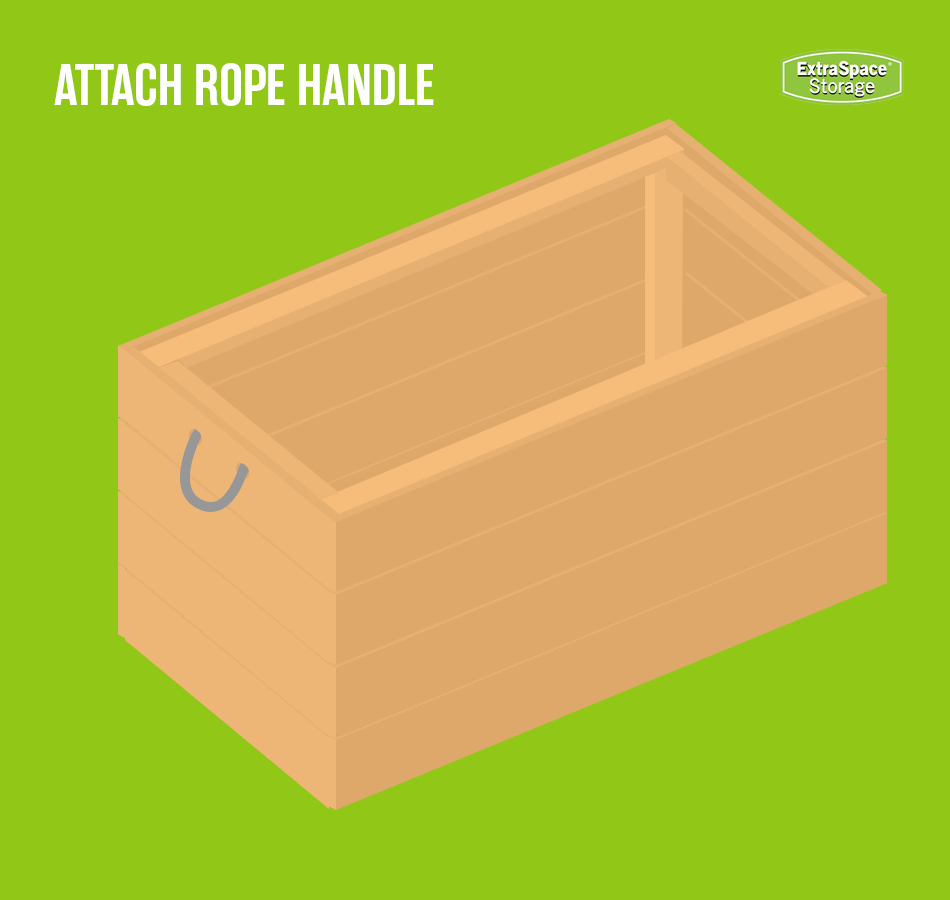
After the stain dries, To complete building a wood crate with rope handles, choose a durable outdoor rope, roughly ⅜” thick, and cut two 16″ pieces. To prevent fraying, you’ll want to create a rope splice. After ensuring the stain has dried and you’ve spliced the rope, thread it through the holes you drilled, and secure the ends inside with knots or strong adhesive. For extra durability, reinforce the knots with a few more wraps before trimming the excess.
Step 8: Attach Caster Swivel Wheels

Adding wheels to your crate is an optional step that grants extra access and mobility to your DIY home project. You should choose sturdy caster swivel wheels, roughly 3″ in size, that hold up and ensure the crate can be moved in any direction. Attach these wood crate wheels by placing a caster at each corner, ensuring they’re evenly spaced and aligned. Use a drill to make pilot holes, then secure each caster by screwing the wood screws through it into the crate’s bottom. Tighten them firmly but avoid over-tightening to prevent damaging wood.
Decor Tips for a DIY Wooden Crate
There are plenty of smart ways to style your wooden crate. Whether you’re using it for storage or display, these home decor ideas will help make the most of your new crate and enhance your living space.
Turn It Into a Dual-Purpose Storage Table
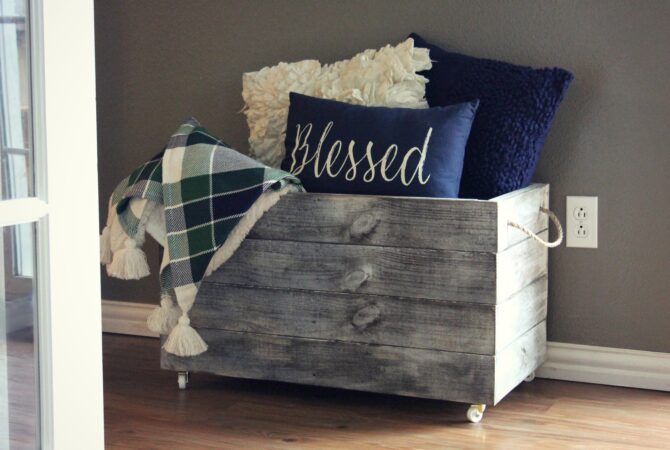
Wooden crates are incredibly versatile, making them ideal for organizing everything from extra pillows and blankets to toys, patio firewood, or even pantry kitchen storage. You can easily turn this DIY crate into multi-purpose furniture by flipping it on its side or adding a flat surface on top to create a compact tabletop. This space-saving furniture idea is perfect as a side table, coffee table, or nightstand. Beneath the surface, the crate offers hidden storage for smaller items like books, magazines, or remote controls, keeping your living room organized and tidy. Though this farmhouse wooden crate is sturdy enough to hold everyday belongings, it’s important to remember that it’s made from pallet wood and to exercise caution when loading and lifting items.
Use the Crate as a Bookshelf
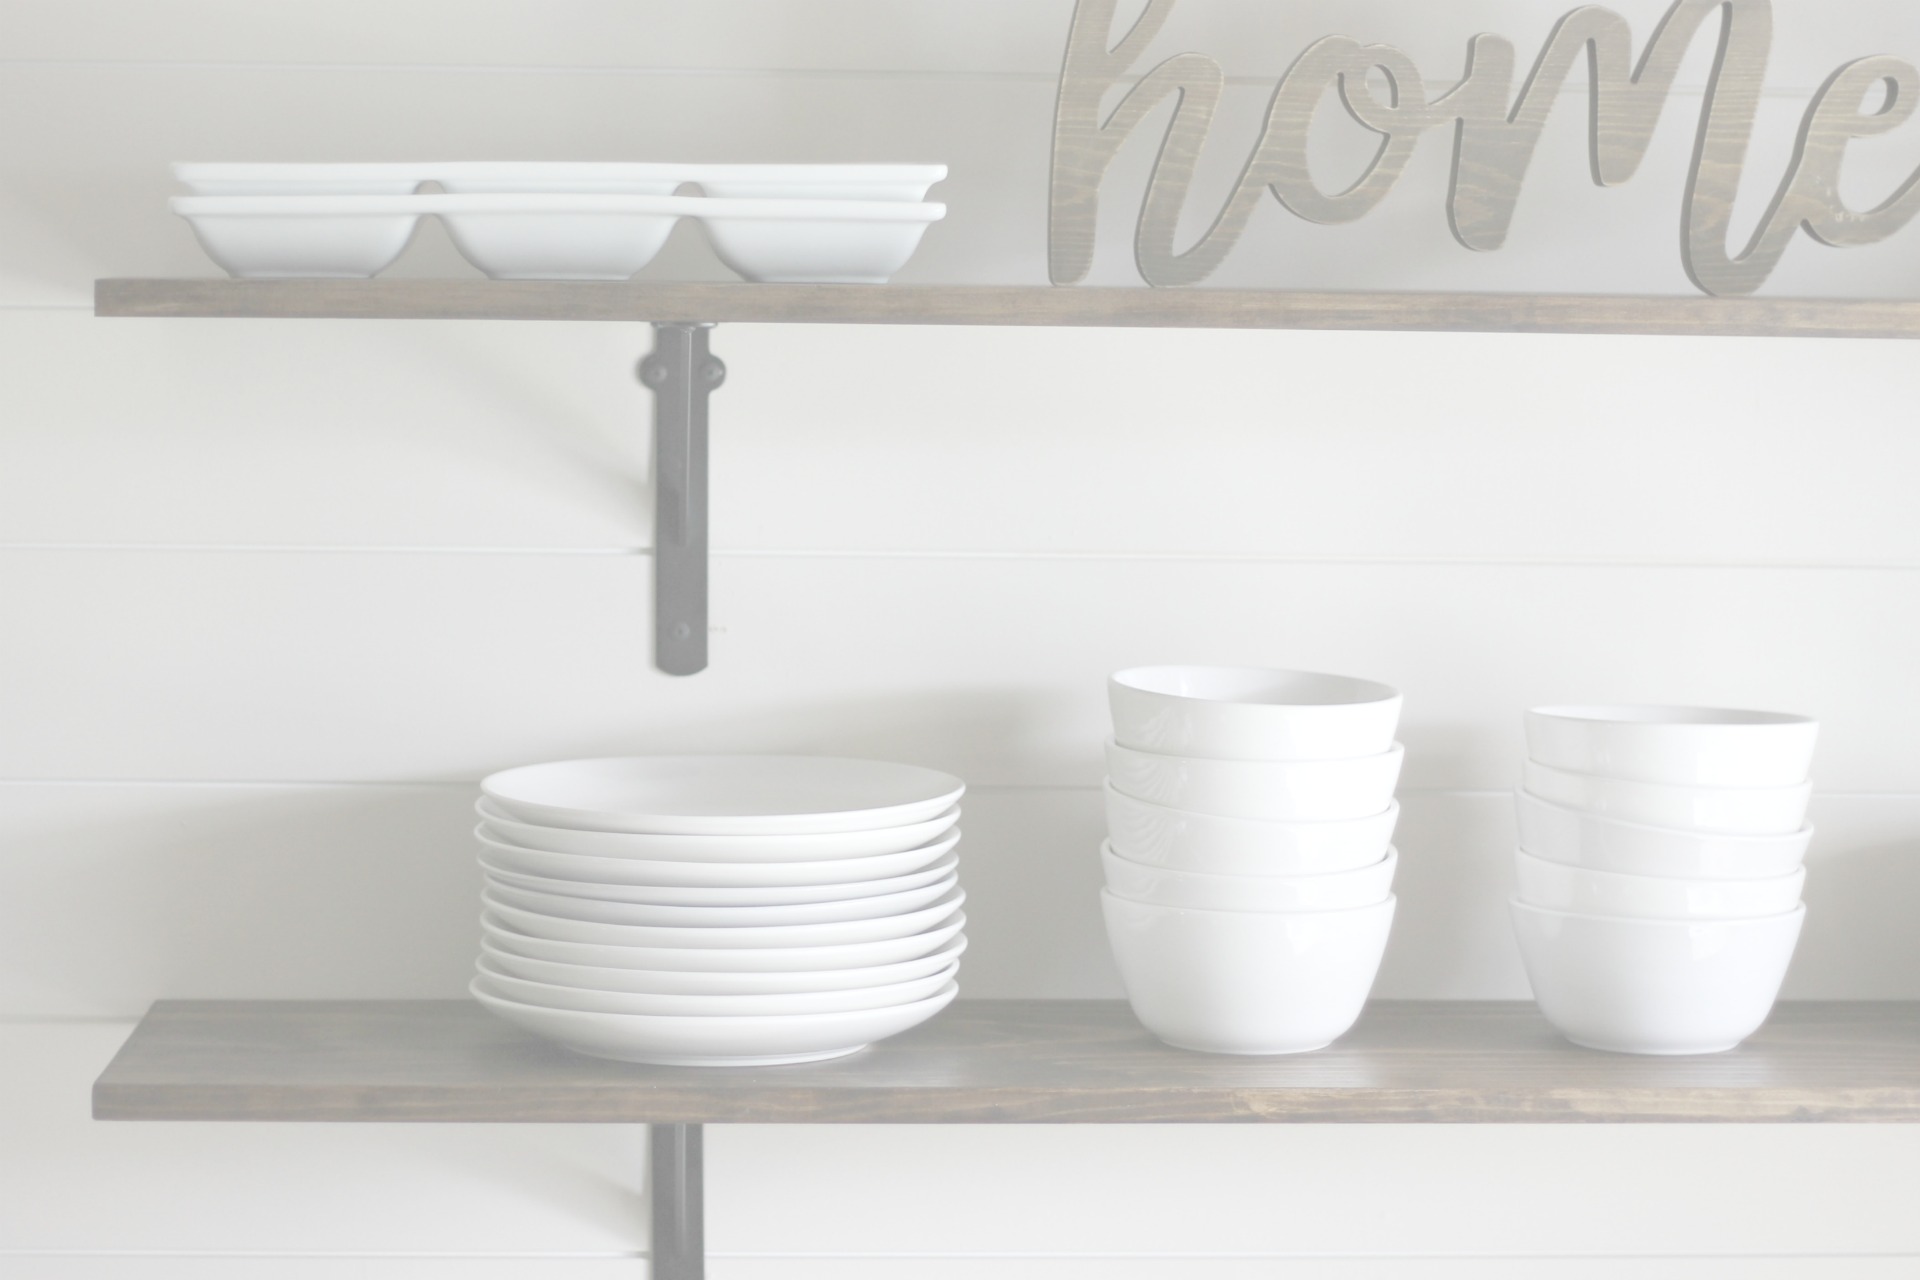
A wooden crate bookshelf is a useful and stylish addition to any room, combining function with rustic charm. Maintaining a well-organized bookcase is an excellent way to maximize vertical space in small apartments and home offices. Wood crate shelving holds small decorative items, appliances, and kitchen tools, depending on where you place them. The crate’s open design allows for easy access to items, and rotating and stacking wood crates offer the flexibility to adjust the size and shape of your bookshelf as needs change. If you only craft a single crate, you can still place a few books inside for a tidy wood book holder.
Create a Floral Arrangement
A great way to emphasize a DIY storage box is by transforming it into a crate flower box. Artificial flowers will fit perfectly into your space to replicate the look and feel of a farmhouse planter. If you want a more authentic look by planting real flowers, you’ll first want to add a liner to prevent soil and water from running through the crate’s gaps. Heavy-duty plastic or burlap can be stapled or nailed across your crate’s interior, which will help retain water inside the reservoir and prevent wood rot. Once done, you can safely add potting soil with compost and start planting. If you’re storing indoors, choosing common houseplants or pet-friendly houseplants are smart, simple options.
Repurpose as a Drink Caddy
Turning a DIY storage crate into a portable drink caddy is a functional upgrade that adds a vintage touch to your entertainment space. Whether hosting a party, planning a picnic, or organizing your home bar, a wood crate caddy is a great way to transport drinks and accessories. Consider adding dividers or small compartments inside the crate to separate bottles, cups, and drinkware. A sturdily constructed crate offers durability, and with rope handles, you can easily carry it from room to room or outdoors.
***
Need somewhere to store tools and supplies after building your wood crate? Extra Space Storage has storage facilities located across the country that can help with your transition. Find self storage near you!