Whether you plan to host lively outdoor parties or want to create your dream backyard, having somewhere to eat and sit is crucial—especially if you can do it without spending a fortune. If you need an outdoor patio table or rustic picnic table, these plans work for both! Here’s how to build a DIY outdoor dining table.
Supplies Needed:
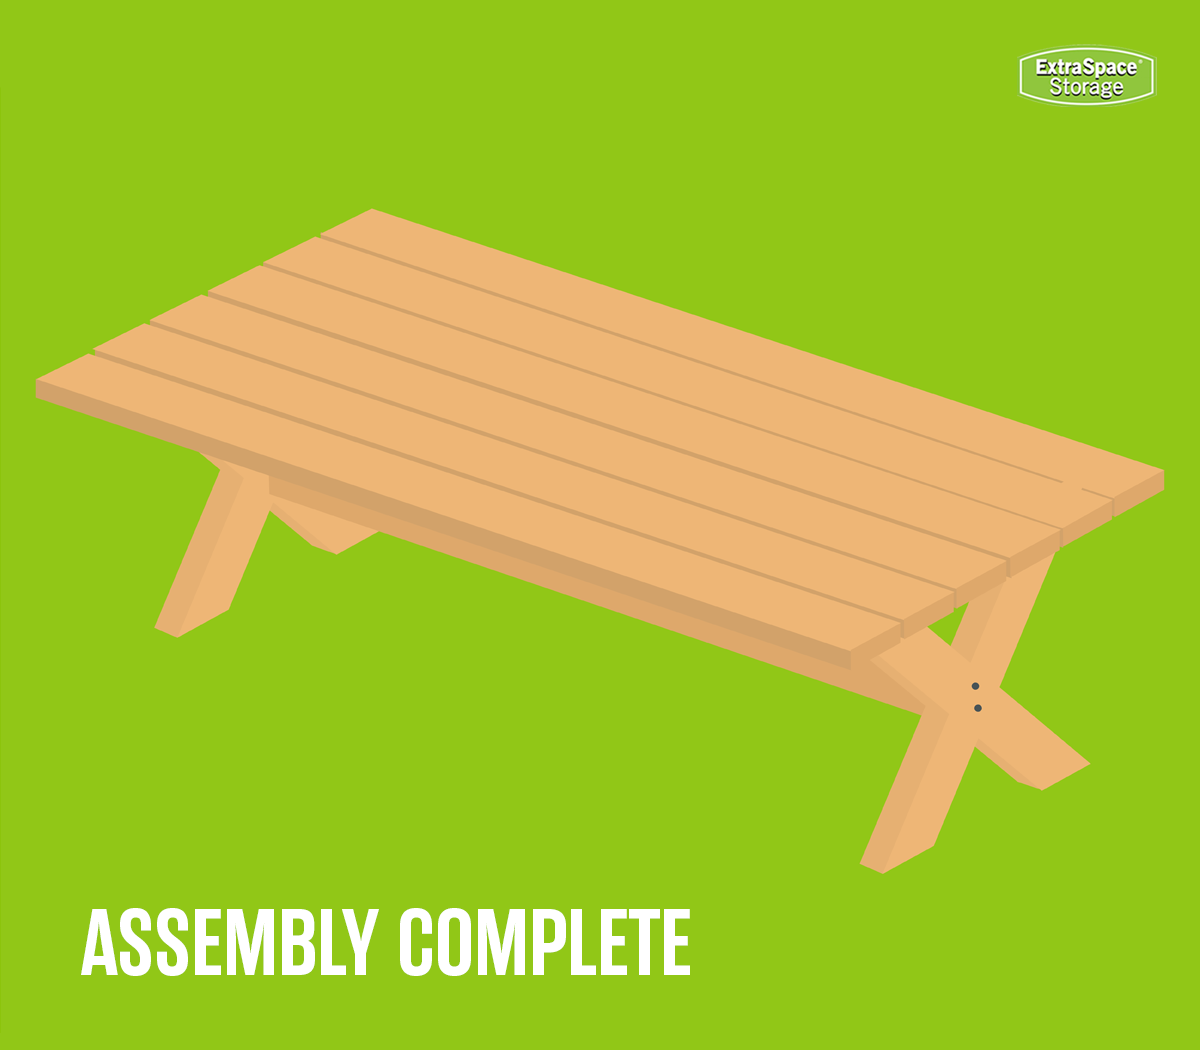
The following materials listed will create one picnic table measuring 6′ long x 2′ wide x 33.5″ high. We encourage you to adjust this supply list as needed to create your desired table size.
Material dimensions are written as Thickness x Width x Length—please note we use nominal sizes, rather than actual lumber sizes.
- 8′ 2x6 boards (x10)
- 80-220 grit sandpaper
- Carpenter gloves
- Chisel
- Drill
- Drop cloth
- Exterior screws (1 box of 2½ inch & 1 box of 3½ inches )
- Furniture paint brush or mini roller
- Hand saw
- Level
- Outdoor furniture paint
- Pencil
- Rags
- Safety goggles
- Sealant brush
- Tape measure
- Wood screws (1 box of 4-inch)
- Wood glue
- Wood sealant
- Optional: Electric hand sander
- Optional: Drill bit
- Optional: Painter’s tape
- Optional: Plastic/Latex gloves
- Optional: Wood stain
Cut List:
- 6′ 2x6 (x6) – tabletop
- 31.5″ 2x6 with a 32° angle on each end (x4) – legs
- 32″ 2x3 with ends cut at 32° angles (x2) – end table braces
- 36″ 2x6 with ends cut at 32° angles – middle table brace
- 58″ 2x6 – support beam
Use caution when using power tools. Follow all manufacturer’s instructions and wear proper safety gear. There will be scrap wood left over from some of these cuts.
How to Build a Picnic Table
These picnic table plans are for a six-foot table, but you can customize the size of your table as desired! With the measurements given, this rustic patio table can seat up to eight people, which is perfect for hosting a barbecue, a 4th of July party, or if you just want to give your backyard a makeover on a budget. Ensure you’re wearing appropriate attire—including safety goggles, carpenter gloves, and no loose clothing. Use these instructions to build a picnic table.
Step 1: Plan Your Project
Before diving into your project, take time to plan to ensure a smooth process. Start by determining a suitable workspace—whether it’s a designated area in your home, garage, or workshop storage unit—ensuring it’s large enough for safe and efficient work. Gather all required materials and tools, prep the area, and ask yourself:
- Is this picnic table the right size for my space or should I modify the dimensions?
- Do I have all the necessary tools, or do I need to borrow or purchase additional equipment?
- Should I adjust the material or cut list to personalize the table to my preferences?
- How long will this project take me to complete? (Note that your timeline can be affected by humidity levels, if you are staining.)
Step 2: Choose the Best Wood for an Outdoor Table
For DIY outdoor furniture, pressure-treated lumber is the best choice, as the boards are better preserved, durable, and budget-friendly. Softwoods that are simpler to work with, like pine and redwood, are good options for a DIY picnic table—or you can choose a hardwood like cedar or oak that’s naturally more resistant to rot. Or splurge on cypress or cedar boards for their beauty. Be careful when picking out your lumber—avoid wood that’s warped, split, or has large knots.
Step 3: Sand the Wood
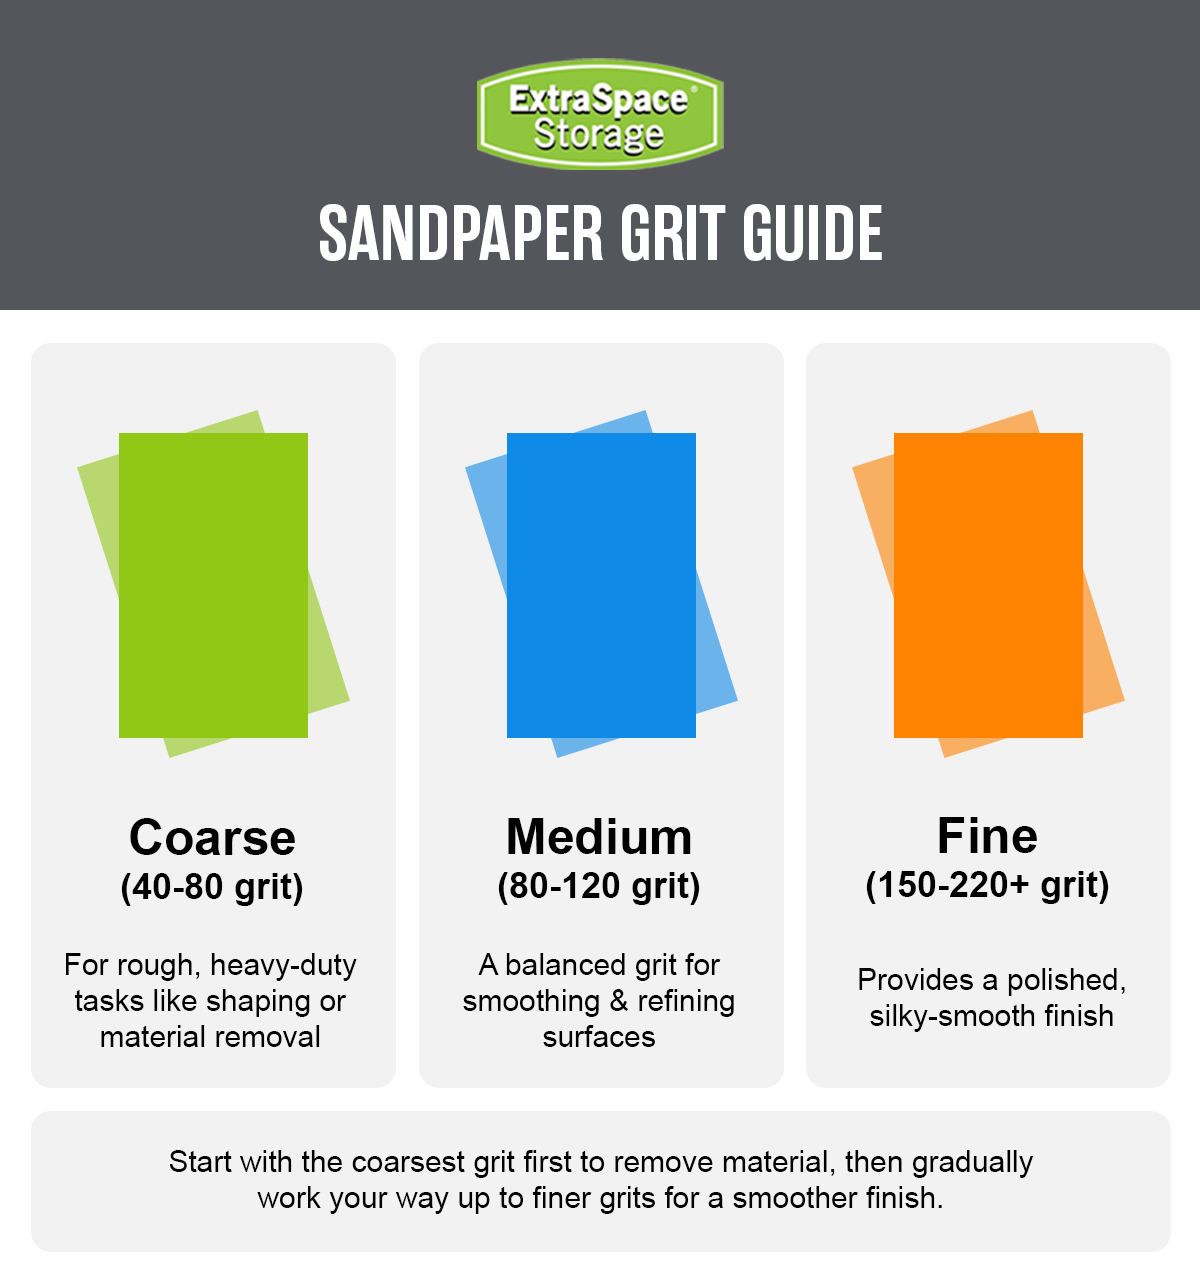
The first step to building your patio table is to sand all your wood. Some people prefer to leave a bit of roughness to the wood of their outdoor patio table to retain a rustic feel—for a coarser look, go for a 220-grit sandpaper, and for a smooth feel, use an 80-120 grit. You can use sandpaper for this step, but it’ll be faster and easier with an electric hand sander.
Step 4: Cut the Tabletop & Leg Boards
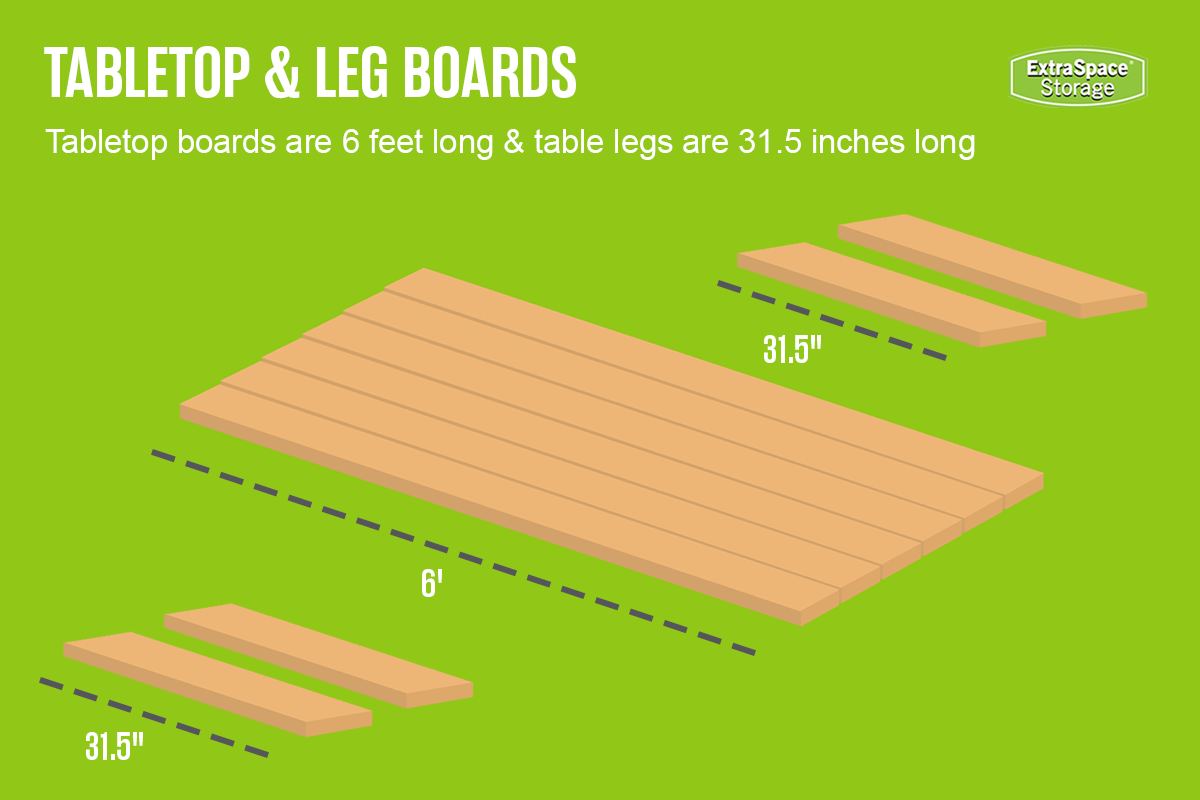
Keeping your protective gear on, measure and mark to six feet on six 2x6 boards. Check this measurement again before sawing the extra two feet off. These six boards will become your tabletop, but set aside for now. Then, take two new 2x6s and cut four boards measuring 31.5″ to create your four table legs. Cut a 32° angle on each end.
Step 5: Assemble the Table Legs
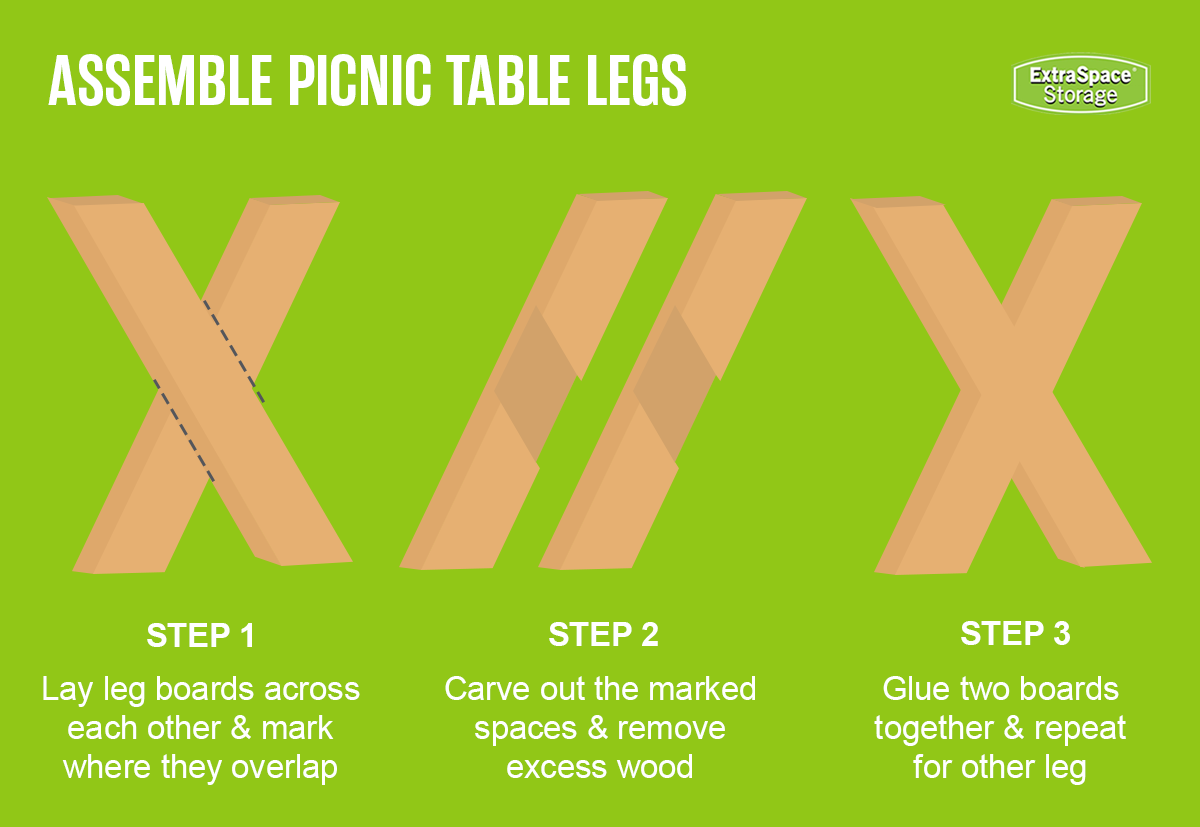
The next step for this wooden garden table is to cut out spots that will allow the leg pieces to fit together perfectly—in other words, you’ll create table legs that recess where they cross. Follow these instructions to build your picnic table legs:
- Grab all four 31.5″ boards you cut in Step Four. Pair them together.
- Lay each pair of leg boards across each other in an “X” shape, and mark where they overlap with a pencil. Verify this positioning.
- Carve out the marked space for one board by cutting grooves with a hand saw, breaking away the grooves, and using a chisel or brush to remove the excess wood.
- Ensure the uncut board fits into the open space completely.
- Glue two boards together at the notch with wood glue and lay flat to dry. Repeat for the other leg.
Step 6: Cut, Attach the Smaller Braces & Build Table

To increase the stability of your DIY table, make three table braces—two for the ends, and one for the middle of the table. You’ll then need to attach these pieces together, which goes easier if someone holds the tabletop for security. Follow these directions to assemble your DIY picnic table:
- Cut a new 2x6 to 36″ long, then cut the ends at 32° angles to create the middle brace. Set aside.
- With this scrap 2x6, measure and cut a 32″ piece. Cut it lengthwise to create two skinnier 32″ boards—these are your end braces. Trim all four ends to 32° angles. Set aside.
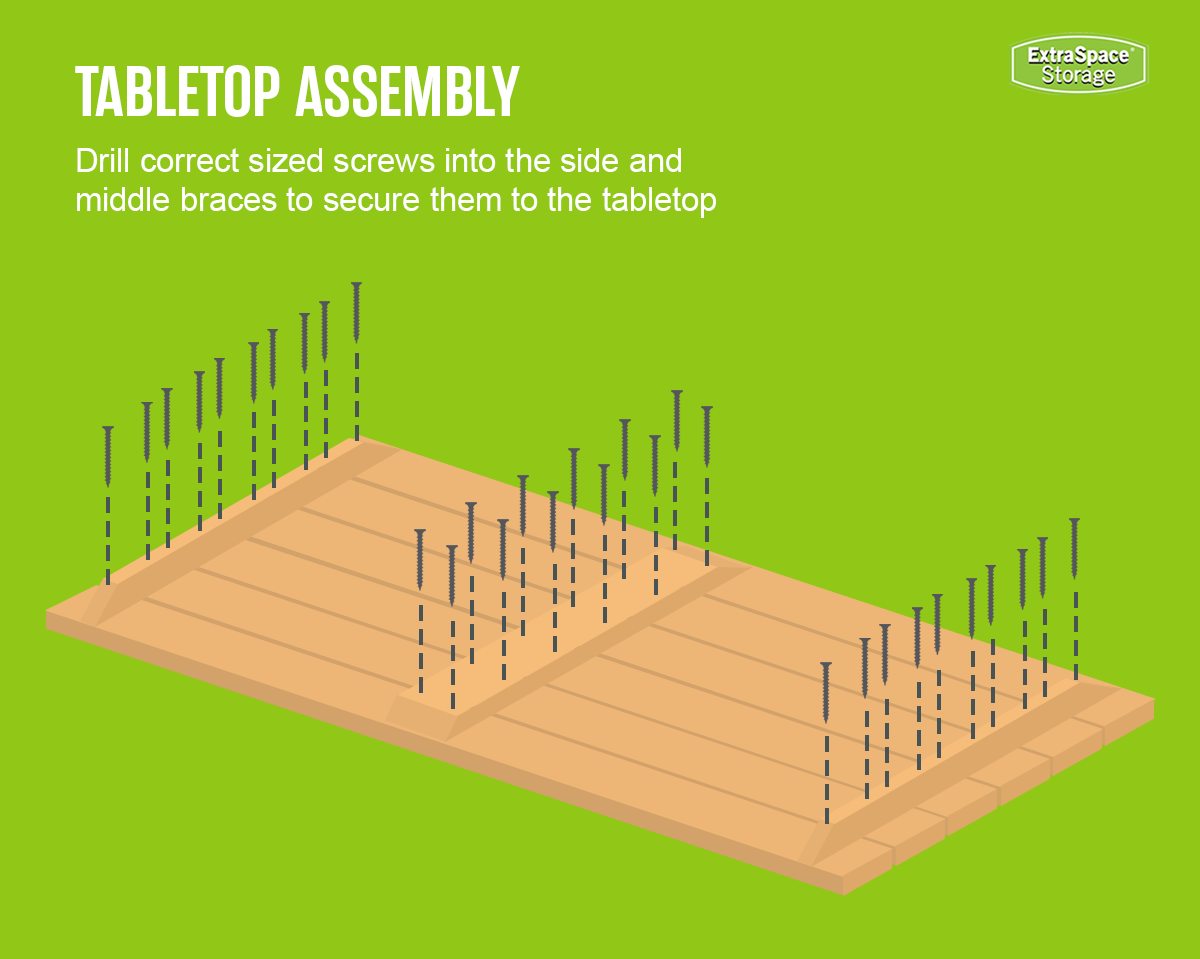
- Lay your six tabletop slats on the ground, with the “good” side facing down.
- Place each side brace two inches from the edge of the tabletop, with the angled edges facing up.
- Pre-drill* ten pilot holes into each side brace (two for each slat of the tabletop, and one for the ends).
- Drill 3½-inch exterior screws into the side braces to secure them to the tabletop.
- Next, measure where the middle of the table is between the two side braces (about 33.5″), then use 2½-inch screws to attach the middle brace.
- Take your assembled table legs and place them against the edge braces, facing toward the middle of the table. Use 3½-inch screws to attach the table legs to the end braces.
*Drilling pilot holes will help prevent the wood from splitting when you drill in your screws.

Step 7: Cut & Attach the Long Brace
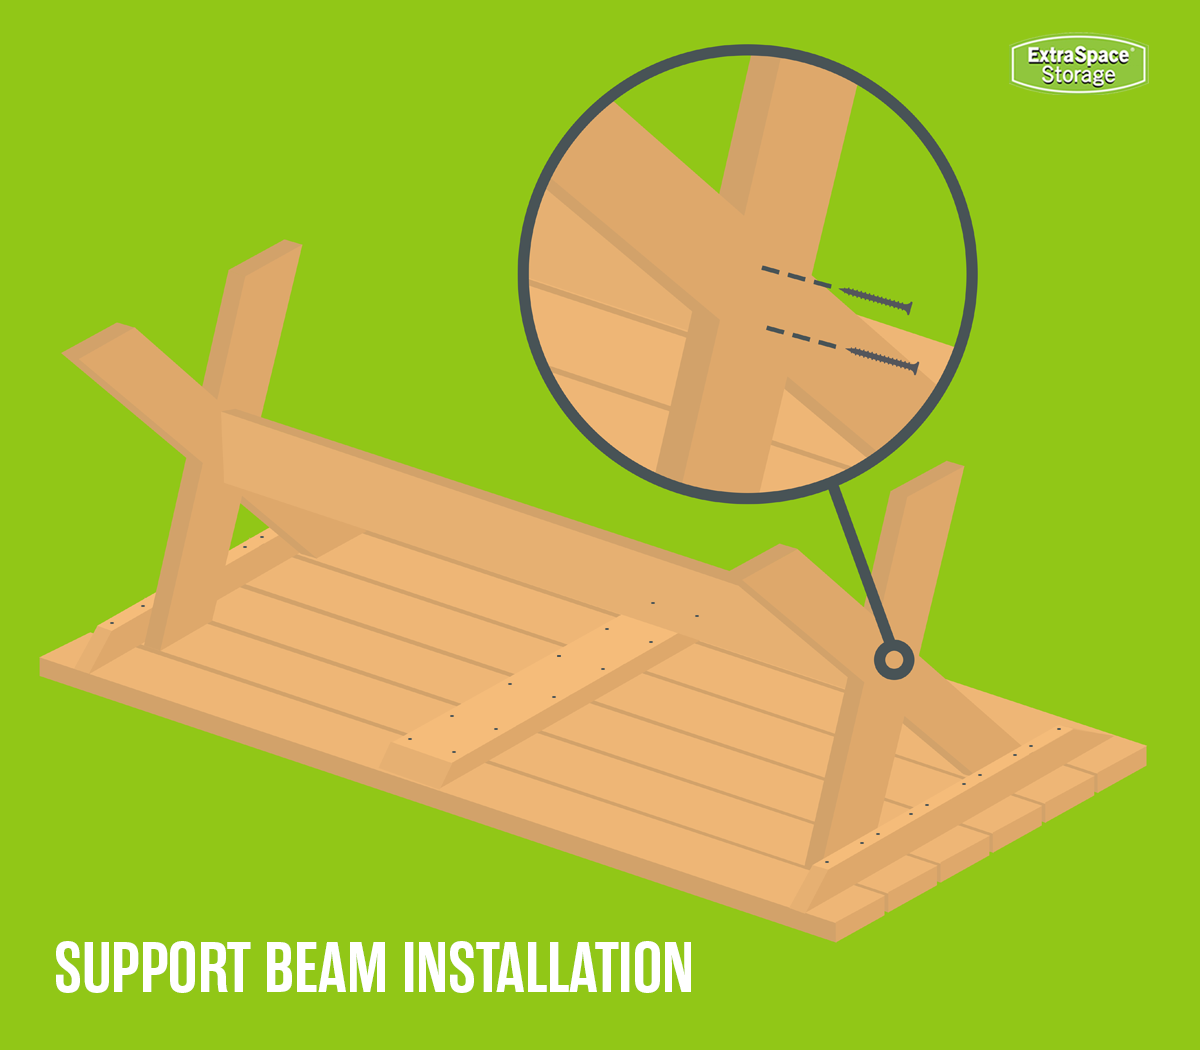
As another added measure for picnic table stability, it’s best to create a support beam that runs between the table legs. Ask for some help, and follow these instructions to finish building your outdoor table:
- Measure the space between the table legs—it should be about 58″. Verify this measurement before cutting the 2x6 into your table leg support beam.
- Using a level and assistance, set this board perpendicular to the tabletop, as close to the middle of the “X” of the table legs as possible.
- Drill two wood screws through the recessed leg joints into the brace to increase structural integrity.
Step 8: Add Finish to Your Wooden Patio Table
Verify whether you purchased and used pressure-treated wood for your DIY picnic table. If you did this, wait a few months after the lumber’s pressure treatment date to stain the boards—this is to ensure all parts of each piece are completely dry before you seal in any moisture accidentally. Stain the entire table—and let dry completely between applications—to provide long-term protection against the elements. Use a minimum of two coats of your desired wood stain color to ensure coverage—the color deepens with each layer. Wear plastic gloves, if desired, or use clean work rags to evenly spread and wipe up excess stain. Allow the table to dry completely—if your workspace is outside or doesn’t have humidity control, adjust your timetable to allow for additional air moisture.
Step 9: Use Sealant for Long-Term Stability
The final step to building an outdoor table is sealing it. Wood sealant helps protect the boards from moisture penetrating them—which can cause rotting, splitting, and warping—so apply it to the whole table. Painting your DIY outdoor table? Try to buy outdoor furniture paint that has sealant already in it. Otherwise, spread an even layer of sealant with a sealant brush and let it dry for the instructed amount of time, or around 24 hours. Whether you painted or stained your wooden outdoor table, re-apply sealant every one to three years to keep it in good condition.
Tips for Decorating Your DIY Outdoor Table
Now that you’ve built your DIY backyard table, you get the pleasure of decorating it. Whether you’ll mostly use your table as backyard decor or plan to have large meals and parties, there are plenty of picnic table decor ideas that can fit your outdoor living space, even on a budget.
Go With a Theme
When considering picnic table decorating ideas, think about designing along with the elements in your outdoor living area for a cohesive backyard design—or have a themed table. Having a Christmas party? Consider ideas for setting a holiday table! Host an end-of-summer celebration and decorate your table with paper cut-outs, blown-up beach balls, and sunglasses. Take inspiration from your own backyard using the colors you see there—you can even add flowers from your backyard to small vases for your patio table centerpiece.
Add a Tablecloth or Runner
Since they often stay outside year round, wooden garden tables can get dirty. That’s why it’s a good patio table decor idea to get a weatherproof tablecloth or runner to add protection and style! Some use a thin throw blanket or simple piece of fabric for their tablecloth—materials like bamboo, coated polyester, and jute are common weatherproof fabrics for outdoor decor. For just a one-night gathering, get creative with more delicate materials like netting, burlap, or lace to make a statement with your farmhouse table.
Craft an Outdoor Table Centerpiece
A patio table centerpiece can sit by itself as decor or be used in a tablescape with other elements for a meal. Flowers, plants, greenery, and candles can be incorporated into any style or theme of patio table decor. You can create a simple garden table centerpiece with a lantern, succulents, or small flowers in mason jars. Another fun option is to get elaborate with your picnic table centerpiece by filling a picnic basket with decorative thrift store finds, bake a beautiful dessert for the middle of the table—or upcycle something that goes with your theme, like using a teapot as a vase or making a long garland centerpiece with greenery for the holidays.
Set Each Place
The best thing about an outdoor table and bench is that the meal can be as casual or fancy as you want. Take it up a notch by including table settings for everyone invited! Picnic table setting ideas often include nature or farmhouse-inspired plate chargers, dishes, napkins, and place cards. Think outside the box for your picnic table settings—use pie pans or wicker mats as chargers, vintage or themed plates, and tie cutlery together with twine or ribbon! For an easy look, choose a color scheme and then add a couple of uncomplicated touches—like using a stone for each place card or placing a flower sprig on everyone’s napkin.
***
Need somewhere to store your outdoor furniture in the off-season? Extra Space Storage has convenient facilities located across the country that can help with all your storage needs. Find self storage near you!