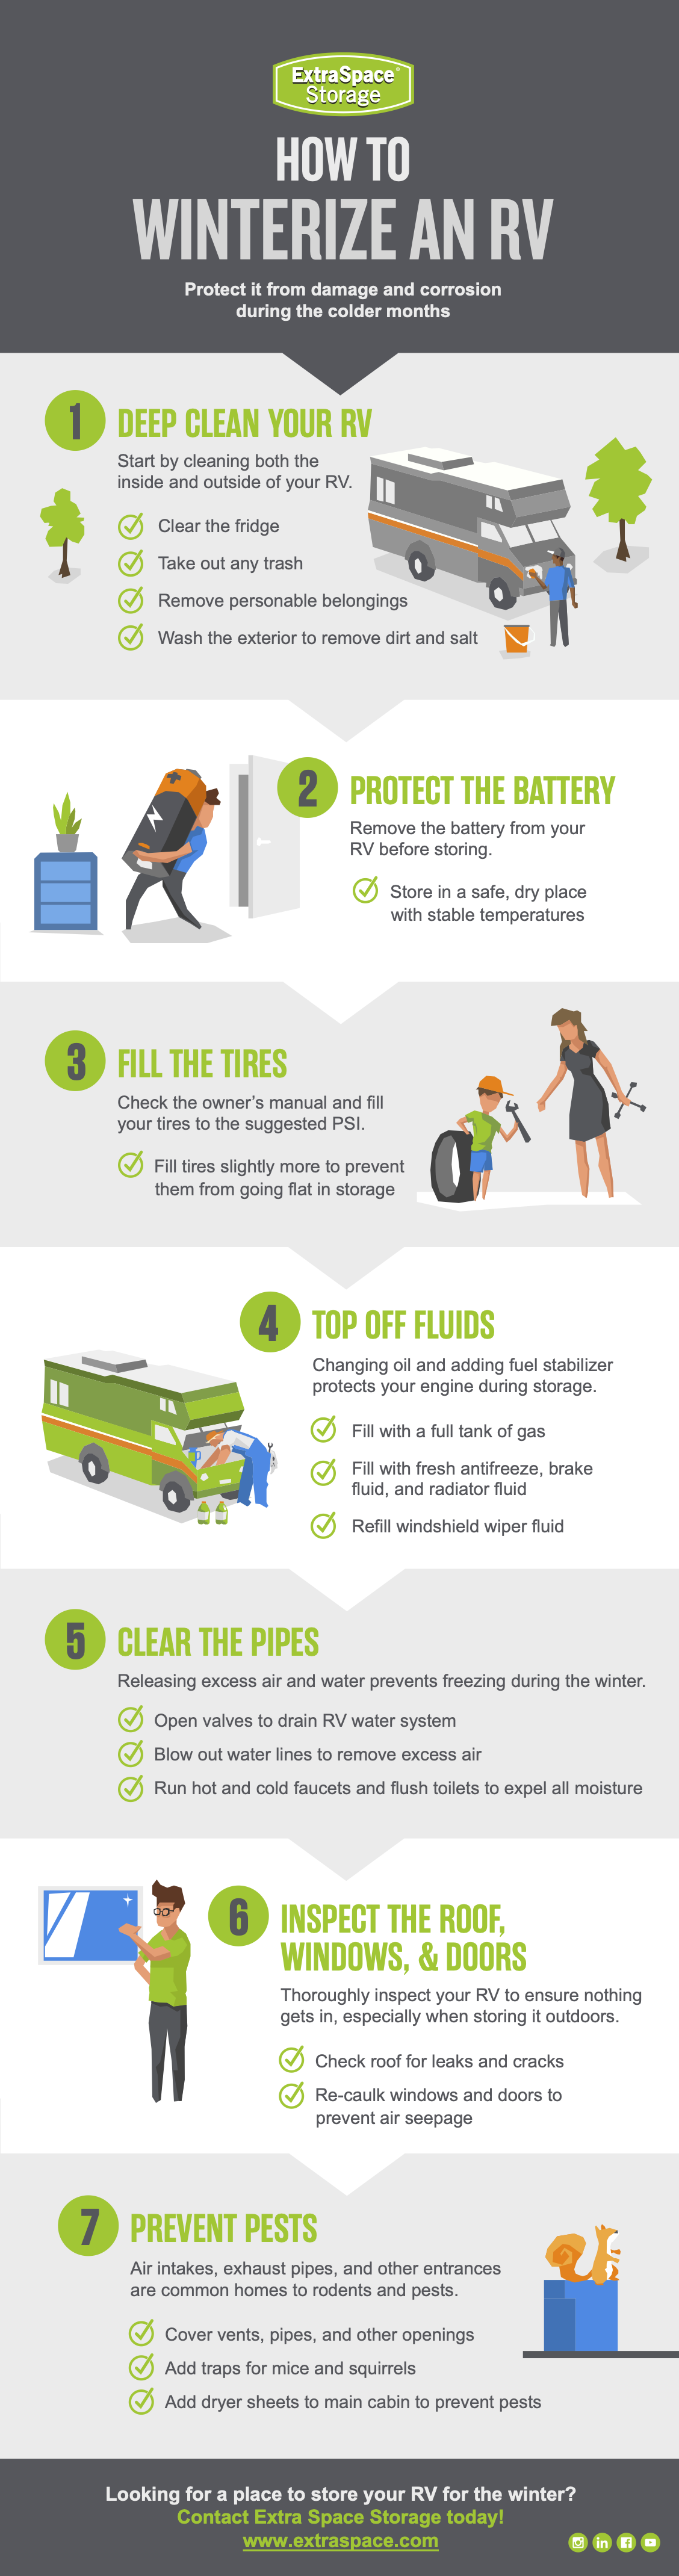
Planning to store a recreational vehicle for the colder months? Winterizing your RV is important for keeping its interior and exterior safe throughout winter storage. Though there are many different types of RVs, most winterization tips will work for campers, travel trailers, and motorhomes alike. Following these vehicle winterization steps can help prevent costly repairs and get you going on vacation sooner when spring comes!
Check the Owner’s Manual
From motorhomes to travel trailers, the best way to protect your investment is to go through your vehicle’s manual. Here, you’ll find information on any built-in winterizing features, how to care for the appliances in your RV, and specific instructions for getting your home on wheels ready for the off-season!
Begin with Deep Cleaning
Cleaning is the first step to prepare for RV storage. Clear the fridge and cupboards of all food and perishable items. Vacuum, take out the trash, and remove all personal belongings that don’t need to be kept in the RV. While you won’t be using linens or dishes during the winter, cleaning these things now will get you back on the road quicker when the weather gets nice.
Take Care of All Appliances
Make sure that inspecting and protecting appliances is on your motorhome or travel trailer winterizing checklist! Refrigerators and ice makers will need time to properly defrost. Washing machines and dishwashers may require extra steps to be ready for winter, so check your manual before storing your RV!
Go to an RV Dump Station
To properly winterize a travel trailer or motorhome, you’ll need to head somewhere where you can safely drain your plumbing system. Before you start clearing out your pipes, remember to disconnect all outer sources of water and turn off system power. Be sure to switch off any gas or propane before getting started as well.
Drain Tanks
Clear out your RV water system! Your freshwater holding tank is the first place to start. Open the valve (also known as the petcock) to let water release. Next, winterize your toilet, sink, and shower by draining the black and gray holding tanks associated with your plumbing system. Once the petcocks on these have been opened and the water has been released, they’ll need to be cleaned. Some recreational vehicles have self-cleaning systems; others will need a good scrubbing.
Run Hot & Cold Faucets
Once all tanks are drained, create a way for lingering moisture and air to escape. Open all RV drain valves—except for the one attached to your water heater—turn on faucets, and flush the toilet a few times to expel any extra liquids. Turning these faucets on will allow air to travel all the way through the system.
Blow Out RV Water Lines
Make sure excess air is eliminated from the pipes so they don’t freeze! Do you already have a blowout plug on your camper? If not, start by attaching a compressed adapter to the water intake line. Then, try blowing out water lines with an air compressor to force any remaining moisture out. Remember to close petcocks, turn faucets off, and return any caps after you’re done with this RV air compressor winterization.
Add RV Antifreeze
Easily distinguishable by its pink color, RV winterizing antifreeze will provide peace of mind by preventing pipes and tanks in your motorhome or travel trailer from freezing. Whether you have a water pump conversion kit or RV antifreeze hand pump, remember to push this liquid through your RV until you see pink coming from every faucet. Don’t forget to flush until you see pink in the toilet bowl as well! Make sure you follow the specific instructions for your motorhome for this step.
Bypass the Water Heater
If you’re hoping to use less antifreeze and don’t have a built-in bypass, you can install a temporary system. Make sure your water heater is off and disconnected from the water supply—the same goes for the hot and cold lines—before you open the pressure relief valve. Once the system has been given proper time to cool, the bypass can be installed. Reconnect the hot and cold lines and set them to off while the RV antifreeze works it way through your RV. After antifreeze has been pumped throughout your water system, it’s finally time to drain your camper hot water tank.
Protect the Battery
RV battery maintenance tips can protect your motorhome or camper if you’re planning to leave it in storage for the entirety of winter! Batteries left in recreational vehicles run the risk of freezing, so consider removing them. Once removed, store batteries in a safe, dry place and clean battery terminals. Planning to start your motorhome at least once a month? Leave batteries where they are, and plug your RV into a 120-volt external power source (also known as shore power) each month for around eight hours.
Fill Up on Gas
Before moving an RV into long-term storage, fill the gas tank to almost full. Because gas begins to break down over time if you’re not driving, it can be hazardous to your engine when it’s time to start it again. Add a fuel stabilizer to slow this process and ensure your engine stays safe during colder months.
WHAT VEHICLE STORAGE UNIT SIZE IS RIGHT FOR YOU?
Change Your Oil
Add fresh oil to your RV before parking it for the off-season. Not only will this keep your engine safe and properly lubricated, but it will be one less de-winterization step to take when spring arrives!
Wash & Wax Your Exterior
Wash and wax your motorhome before temperatures drop too low! Doing this winterization step early will help protect your second home from the elements. Properly cleaning your RV before putting it in storage is a great way to prevent road salt from freezing and creating rust or hurting your paint job.
Clean Awnings
While you’re winterizing your RV, remember to scrub awnings. Unroll any overhangs or covers completely, wash them, and allow them to dry fully before rolling them back up. This can keep mold from forming and prevent damage if any trapped moisture freezes. Have a pop-up camper? Be sure to open, wash, and dry all extendable areas before storing.
Inspect the Roof for Leaks
An important motorhome winterization step is to make sure moisture and pests can’t get into your RV. Thoroughly inspect your roof for any leaks or cracks to assure nothing gets in while your RV is stored.
Re-Caulk Windows & Doors
How do you insulate RV windows for winter to make sure doors aren’t letting in cold air? Re-caulking around door jams and window seals will prevent cold air from seeping into your camper van or RUV.
Pest-Proof Your RV
Covering vents, pipes, and all other openings will help prevent rodents and insects from doing serious damage to the mechanical elements of your travel trailer or camper. Add traps for mice and squirrels, or place dryer sheets inside your RV to keep critters out of the main cabin as well!
Put Wheels on Blocks
Recreational vehicles weigh a lot. Leaving them sitting on concrete all winter can create flat spots in tires and could potentially do permanent damage to your rims. Put wood or a material that doesn’t freeze easily below the entire length and width of your tires. From the largest class A motorhome to smaller campers, using wheel chocks is an easy way to prevent damage to your tires and rims during RV winter storage.
Protect Tires
Before parking your RV for the winter, be sure to fill the tires of your motorhome! Check your owner’s manual, the inside of the driver-side door, or directly on your wheels for the suggested PSI. If you’re utilizing an outdoor storage area or covered parking, add covers to tires to protect them from the elements.
Find the Right RV Storage Solution
Need a place to store a travel trailer, camper, or RV for the winter? Depending on the region you live in and what kind of RV you have, you’ll need to consider either indoor or outdoor vehicle storage options!
Indoor RV Storage Options
- Garage Storage: If you have a toy hauler or camper that fits in your garage at home, this is the most convenient and affordable option for winter vehicle storage.
- Indoor Storage Unit: Get peace of mind by renting a large drive-up storage unit at a self storage facility, which will keep your RV secure and out of the elements.
Outdoor RV Storage Options
- Parking in a Driveway: If your neighborhood doesn’t have any HOA rules against parking an RV in your driveway long-term, this is a free way to store your trailer for the off-season.
- Covered Storage Unit: Though not totally enclosed, a covered parking space at a self storage facility provides some level of protection from the elements.
- Uncovered Storage Unit: An uncovered parking space at a secure storage facility is one of the most affordable vehicle storage options for your RV.
Learn more about the best options for storing your RV by visiting our RV storage pros and cons guide!
***
Looking for indoor, covered, or outdoor vehicle storage for your RV? Extra Space Storage has convenient storage facility locations throughout the U.S. Find cheap storage near you!