moving guide
Your Guide to Packing Kitchen Items for Moving

Whether you're moving long distance or moving locally to a new neighborhood, the kitchen tends to be one of the last rooms people tackle when packing their home. Between fragile glassware and bulky appliances, packing up your kitchen takes a bit more planning than what is required for other rooms. With the right packing supplies, this process can be manageable. Learn more about how to pack the kitchen for moving in this easy-to-follow guide!
Kitchen Moving Supplies
The first step of packing your kitchen is gathering cardboard boxes and other moving supplies. Having everything on hand from the start lets you pack boxes efficiently and ensure that your items will be properly protected during transit. These are some of the packing essentials you'll need:
Moving boxes: Small boxes for heavy items like cast iron, canned goods, and small appliances and medium boxes for lighter items like plastic mixing bowls, dish towels, dry goods, and utensils
Dish pack boxes: Double-walled boxes designed for fragile items like
dishes and glassware
Box dividers or cell kits: Ideal for organizing and protecting glasses and stemware
Packing paper: Useful for wrapping dishes, lining boxes, and filling empty space
Bubble wrap: Best for wine glasses, crystal, and other delicate items
Foam sheets or pouches: Help cushion and separate plates and bowls
Packing tape: Use extra to reinforce the bottom of heavier boxes
Permanent markers: For clear, easy-to-read labeling
Cardboard sheets: Helpful for separating layers within boxes
One simple way to cut down on supplies is to use items you already have. Kitchen towels, cloth napkins, and dish rags work well as padding for fragile items and help you stick to your moving budget—as well as making for a less wasteful, more eco-friendly move.
When to Start Packing the Kitchen
Since you'll need access to dishes, glasses, and other basic cookware, you should wait to start packing your kitchen until later in the moving timeline. Start by packing non-essentials three to four weeks in advance, including specialty appliances, holiday serving pieces, extra dishes, and canned pantry items. As moving day gets closer, work through perishable and frozen foods instead of restocking to reduce what you need to transport, and clear out anything expired or unnecessary. In the final few days, pack your everyday items and set aside a separate “kitchen essentials” box with what you’ll need right away in your new home.
How to Pack Dishes for Moving
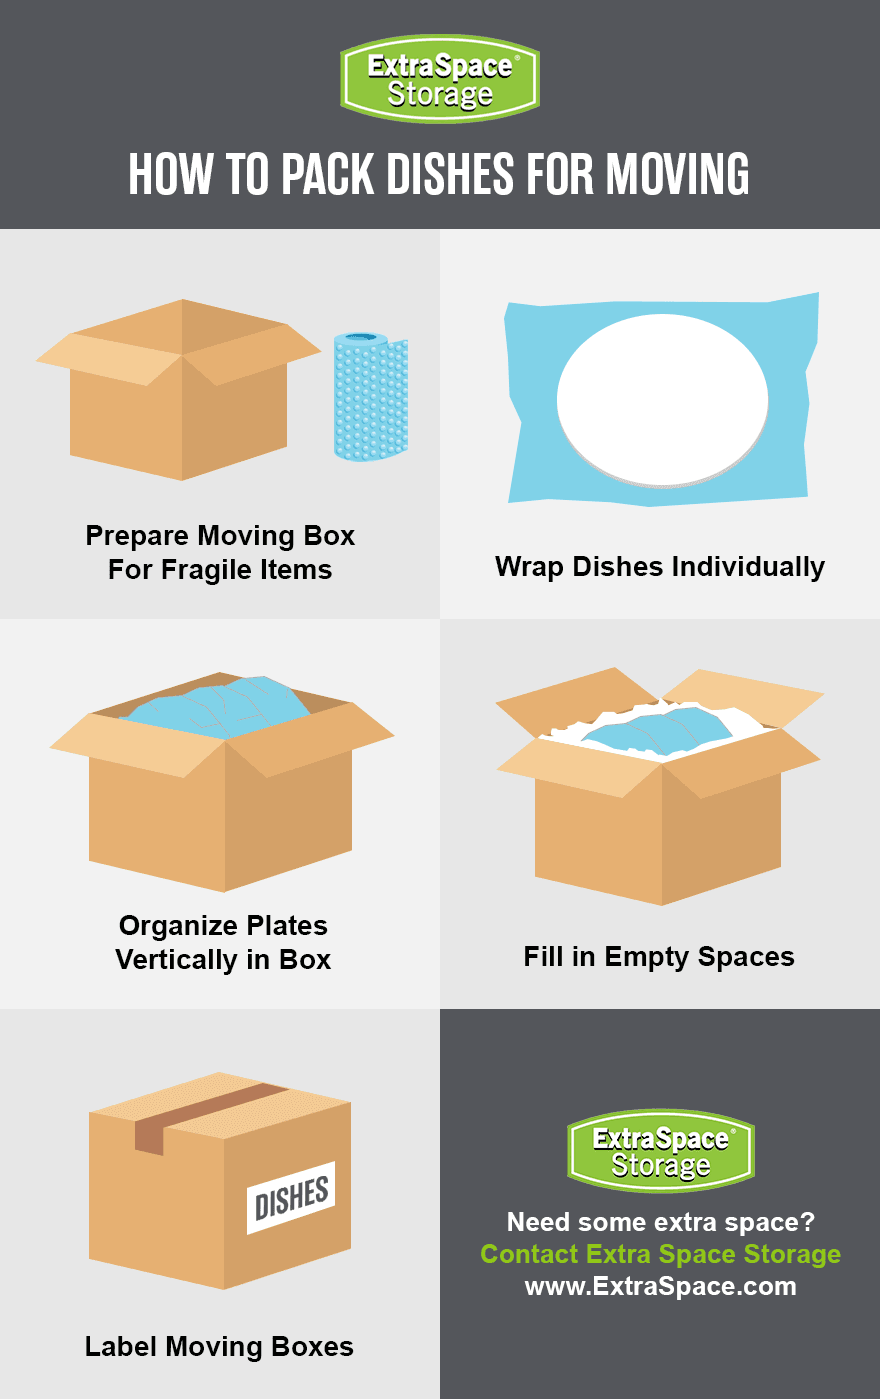
Dishes are among the most breakable items in any kitchen, and how you orient them in the box matters as much as how you wrap them. Start by reinforcing the bottom seams of your dish pack box or small moving box with several layers of packing tape, then add at least two inches of crumpled packing paper at the bottom for a cushioning base.
Plates & Flat Dishes
Lay each individual plate face down in the center of a sheet of packing paper, fold the excess over, and secure with tape. When packing china for moving or other delicate dinnerware, add a layer of bubble wrap between plates before boxing. Place plates vertically in the box, standing on their edges rather than stacking them. This distributes pressure more evenly and significantly reduces the risk of cracking during transit. Keep similar items together, like putting dinner plates in one box and side plates and saucers in another.
Bowls
The best way to pack bowls is by wrapping each one individually in packing paper, folding each corner into the center and securing with tape. Nest wrapped bowls inside one another only if the padding between them is thick enough to prevent contact. Otherwise, pack them in single layers separated by foam sheets or cardboard.
Casserole & Baking Dishes
Pack heavier items like baking and casserole dishes at the bottom of boxes, since these tend to be heavier than standard dinnerware. Wrap each piece in packing paper, and use foam sheets between stacked pieces to prevent scratching. Make sure to fill every gap in the box with crumpled packing paper before sealing. Label each box "Fragile" and "This Side Up" on all four sides and the top to ensure careful handling during transport.
How to Pack Glasses & Stemware for Moving
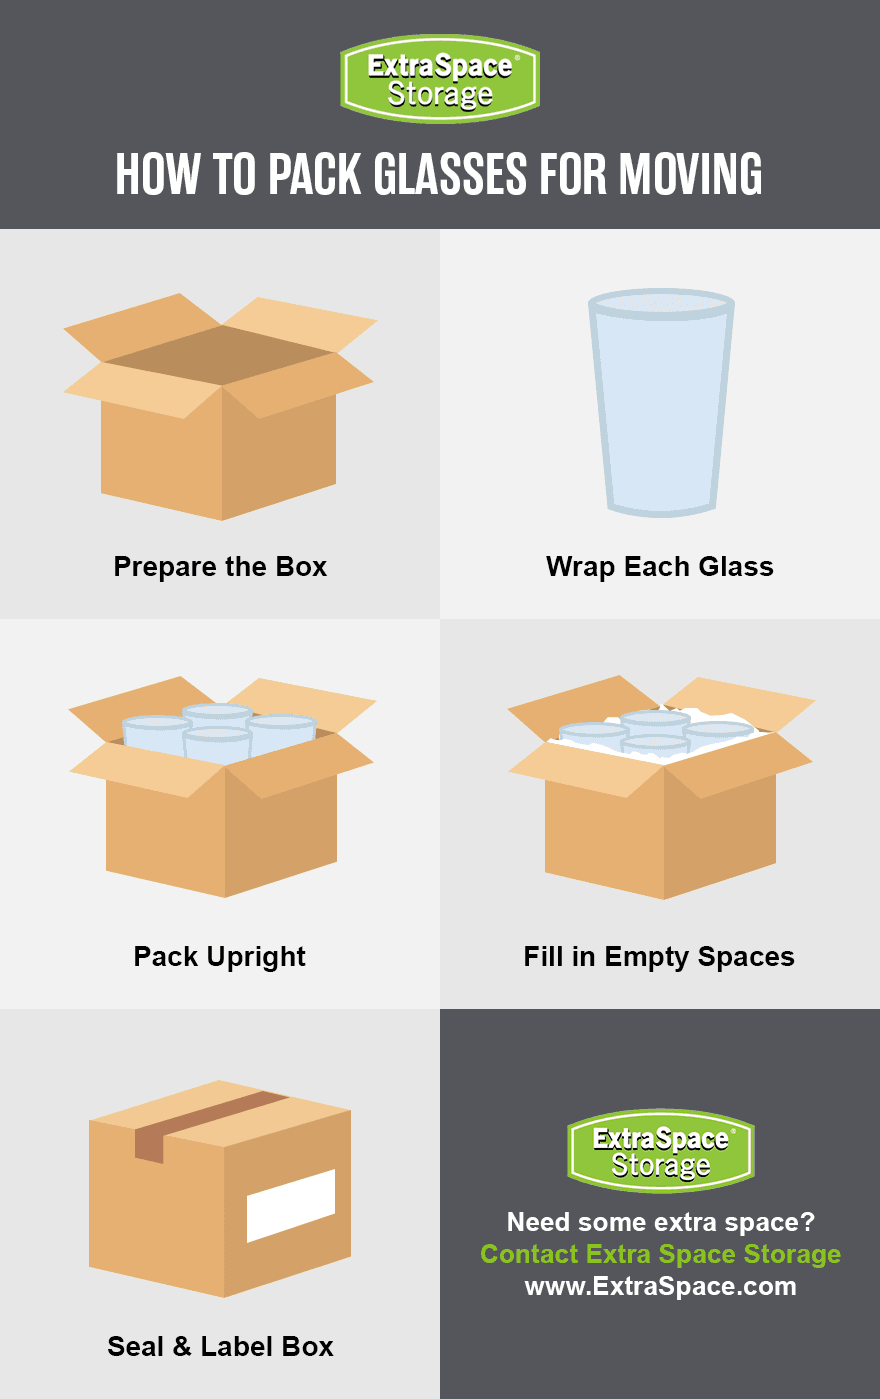
Box dividers are the most effective protection available for fragile items like crystal stemware, wine glasses, and drinking glasses, since they keep each glass in its own cell—eliminating glass-to-glass contact during transit. Check out these easy steps on how to pack glasses for moving!
Drinking Glasses & Mugs
Stuff the interior of each glass with a ball of crumpled packing paper for internal cushioning. Then wrap the outside in a full sheet of packing paper, rolling the glass diagonally and tucking in both ends. Place glasses upright in a box with dividers. It's important to never pack glasses on their sides, as they're more vulnerable to rim damage when laid flat.
Wine Glasses & Stemware
Since the stem on a wine glass is the most fragile point, first wrap the stem with a small piece of bubble wrap, then wrap the entire glass in packing paper as you would a standard glass. Pack stemware upright, and avoid placing anything heavy in the same box. If you don't have box dividers, placing rolled-up cylinders of packing paper between each glass can reduce movement and shifting significantly.
Find Affordable Self Storage Near You
Extra Space Storage has over 4,000 locations across the U.S. with friendly customer service, advanced security features, and affordable month-to-month rates.
- Save up to 40% off online
How to Pack Pots and Pans for Moving
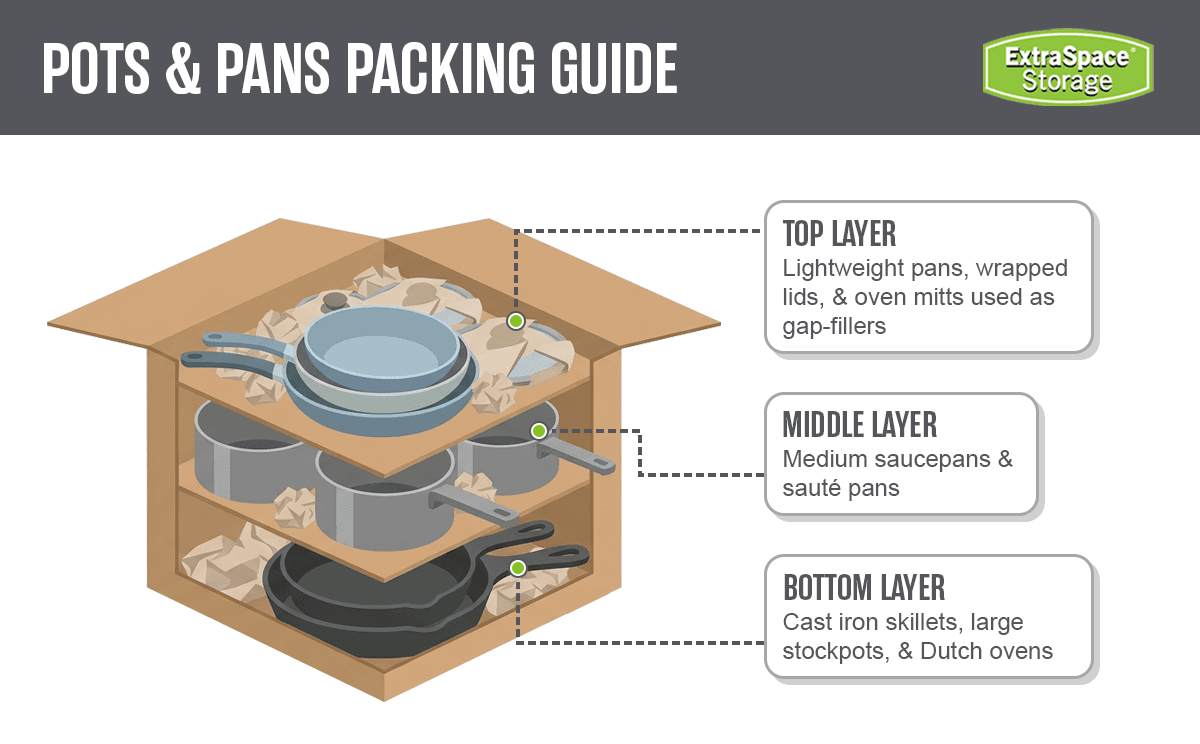
The best way to pack pots and pans and other cookware is to nest pots inside one another where sizes allow, placing a layer of packing paper, a foam sheet, or a folded dish towel between each piece. Pots and pans are durable, but they're susceptible to scratches, dents, and coating damage without proper padding between pieces.
Cast Iron
Pack cast iron pieces at the very bottom of a small moving box, individually wrapped in packing paper or a cloth. Cast iron is dense enough that even a single skillet can make a small box too heavy, so keep that in mind when packing. If you stack multiple pieces, make sure the box is secure and manageable to carry before sealing it. Fill empty space with dish towels or packing paper to prevent shifting.
Non-Stick Cookware
Because scratches in a non-stick coated pan compound over time and affect performance, you'll want to make sure that you put soft layers in between each piece of cookware. Packing paper or soft cloths usually provide enough protection, so you won't need to use bubble wrap. Non-stick pans tend to be more lightweight than cast iron, so nesting them inside one another is more ideal—just make sure your box doesn't get too heavy.
Lids
Lids should be wrapped separately in packing paper or bubble cushion and packed upright on their edges in a dedicated dish pack box—or alongside other flat, padded items. Resting lids flat on top of a pot is one of the more common causes of glass lid breakage during transit, so avoid this whenever possible. Metal lids are more durable, so rely on your own judgment.
How to Pack Small Kitchen Appliances for Moving
Small kitchen appliances are best packed in their original boxes, since they are designed around the exact shape of the item and often include foam inserts that absorb impact during transit. If you no longer have original packaging, a medium moving box with ample padding is a reliable substitute. Before packing any appliance, make sure it's clean, dry, and empty.
Coffee Makers & Blenders
Remove and wrap individual components of the small kitchen appliance—such as the carafe and filter basket for a coffee maker or the pitcher, lid, and blade for a blender—in packing paper or dish towels. Then wrap the main body of the appliance. Place all of these items together in a medium moving box, keeping them grouped so nothing gets lost during the move. Fill any empty space with crumpled packing paper to prevent shifting, and avoid placing heavier items on top.
Toasters & Toaster Ovens
To pack a toaster, start by unplugging it and removing the crumb tray. Empty and brush off the tray, then wrap it separately in packing paper to prevent crumbs from spreading during the move. Wrap the toaster or toaster oven in packing paper or a towel and pack it upright in a medium box. Add padding around all sides, and fill any gaps to keep it from sliding around during transit. This type of appliance has delicate internal components, so you should avoid stacking heavy items on top, though toasters can usually share a box with other lightweight items.
Stand Mixers
Stand mixers are heavier than most small appliances and require their own box. Detach and wrap each individual component—including the bowl and paddle or whisk attachments—and nestle them around the base of the mixer in the box. The mixer body should be wrapped in a moving blanket or several layers of bubble wrap before boxing to help protect its delicate components from being damaged by impact.
Microwaves
Microwaves are large enough to require their own medium or large moving box. Remove the glass turntable, wrap it in bubble wrap, and pack it in the same box. Wrap the microwave body in moving blankets or packing paper and secure it with packing tape. Make sure to also secure any hanging electrical cords.
How to Pack Large Kitchen Appliances for Moving
Large appliances such as refrigerators, ovens, and dishwashers require additional preparation before the move, not just packing. Most professional moving companies require these to be cleaned, defrosted, and in some cases professionally disconnected before they'll transport them. Learn more how to pack kitchen appliances for moving below!
Refrigerator
To move a refrigerator, you'll need to defrost and clean it out at least 24 to 48 hours before moving day. Leave the doors slightly open during defrosting to prevent moisture buildup and odor. If your refrigerator has a water or ice dispenser, have a plumber disconnect the water line before the move. When this is all taken care of, empty the fridge's contents, removing, wrapping, and packing the glass shelves and drawers separately in bubble wrap or moving blankets. Then tape the fridge doors shut for transport and wrap moving blankets around the entire fridge.
Oven and Range
Before moving your oven, clean it thoroughly and remove the individual racks, wrapping them in moving blankets or packing paper to prevent scratching. If you have a gas range, a licensed professional should disconnect it before moving day. Electric ranges can typically be disconnected by unplugging, but it is essential to confirm before moving the appliance. Once your oven is disconnected, tape the oven door shut and wrap the entire body in moving blankets, securing them with tape or moving straps to ensure they remain in place.
Dishwasher
Run a cleaning cycle, then disconnect and drain the water supply and drain hoses. Enlist the help of a professional if necessary. Leave the door ajar to allow any remaining moisture to dry before moving day. Dishwashers are typically transported by movers without a box—often wrapped in moving blankets to prevent denting or scratching—but confirm the handling plan with your moving company in advance. Also, don't forget to take photos of how hoses, cords, and connections are configured before disconnecting them. This makes reinstallation at your new home considerably easier.
How to Pack Knives & Utensils for Moving
Kitchen knives and utensils require extra care when packing for a move, not just to prevent damage, but also to avoid injuries when unpacking. Knowing how to pack knives for moving, as well as other kitchen utensils, helps keep everything organized, safe, and easy to set up in your new kitchen.
Knives
Wrap each knife individually by laying the blade flat on a folded piece of cardboard or thick cloth. Then fold the material completely over the blade and secure it with tape. Never leave an unwrapped blade loose in a box. Pack wrapped knives flat in a dedicated box, with blades all facing the same direction. If you have a knife block, wrap it separately in packing paper, with the the wrapped knives packed alongside it in the same box.
Utensils
For everyday utensils—such as spatulas, wooden spoons, ladles, and whisks—group similar items together, wrapping each bundle loosely in packing paper. Pack utensils in a medium box alongside non-breakable items like dish towels or oven mitts. Keep utensils separate from glassware and china; metal utensils can shift and chip delicate items even through wrapping.
How to Pack Pantry Items For Moving
The pantry is one area where it pays to be selective instead of packing everything automatically. Use these tips to decide what to keep and how to pack it safely:
Use up what you can before moving: In the weeks leading up to your move, cook through perishable and frozen items instead of restocking. Check expiration dates and donate any unopened, non-perishable goods you don’t want to take with you.
Pack heavy items in small boxes: Canned goods and dense pantry items get heavy quickly, so use small moving boxes to keep them manageable.
Seal and secure open containers: Place partially-used bags or containers in zip-top bags to prevent leaks, and pack everything upright whenever possible.
Group smaller items together: Pack spice jars and small containers in a lined box, using packing paper to fill gaps and prevent shifting. Make sure all lids are secure to avoid spills.
Plan for refrigerated and frozen foods: These items don’t travel well over long distances. For local moves, use a cooler with ice packs. For longer moves, plan to use, donate, or discard perishables ahead of time, as most movers won’t transport them.
Keep pantry items separate from breakables: Always pack food items in their own boxes and label them clearly. Mixing heavy canned goods with fragile dishware is a common cause of breakage.
***
Moving soon? Find more expert packing guides and other relocation tools on the Extra Space Storage moving hub. And if you need a safe space to store your belongings while you move to your new home, we offer convenient self storage solutions at affordable prices across the U.S. Find self storage near you today!

Author Profile
Quinn Johnson
Quinn Johnson is a moving expert and author for Extra Space Storage. He's moved over 15 times, including internationally, and helped countless others between their own homes. He's happy to lift some boxes for a friend as long as he's paid in pizza. As a writer and content creator for Extra Space Storage since 2019, Quinn shares helpful moving tips and info to alleviate the common stresses of moving.